Pages

Wednesday, January 30, 2013

Oldie but Goodie: Pahlish Fire in the Taco Bell

Today's weather was seriously crazy.  Like for real crazy.  My heart and thoughts go out to those who lost their families, homes, and businesses in the tornadoes that ravaged north Georgia today.  I'm very thankful that we're all ok here in Blue-Eyed Girl land, but it was really nerve-wracking all day.  Although, I did spend most of the day at the allergist, which came back with an astounding I'm not allergic to anything.  Weird, huh?  Oh well!  At least that rules out one more thing in the never ending search for a reason why I've been sick for a very long time. They did, however, determine that I have asthma.  I'm glad to know why, no matter how hard I've tried, I can't run even short distances despite being in really good shape.

Since I've been feeling kinda blah and I'm working on clearing out my old photos, you guys get another Oldie but Goodie!  I'm sure you're so excited.  Photos for tonight's polish, or Pahlish...  (Heh heh heh.  See what I did there?) were actually taken at Disney World this past summer when we went for my 30th birthday, which means that I don't have any bottle shots.  These were taken in full sun with three layers alone without undies.


Fire in the Taco Bell is an orange jelly with hot pink hexes and squares.  I topped the three layers with a thick layer of Seche Vite.  Sadly, you can tell that there's some pull back and shrinking.

Overlook those gnarly cuticles, if you can...  This was in the middle of July at a theme park after all!

The polish applied easily with the glitters coming out on the brush easily and spreading without any manipulation.  I'm sure it would look amazing over undies, which might actually help with the shrinkage, but I didn't wear it over any undies before I sold it.


Despite how pretty this polish is, I decided that the orange just wasn't for me.  As a gal who went to UGA, I'm not a huge orange fan.  Usually, most oranges don't look great on me, either, but Fire in the Taco Bell is actually one that looked pretty good with my skin tone!  Sadly, it appears that Shannon from Pahlish has changed the formula, so if you order it from her store now, it will be a little different than mine.  It's still very pretty, though.

You can purchase Pahlish at her Etsy store, which is restocked every Friday at 7pm central time, and Llarowe.  Although, keep in mind that it's cheaper to order directly from Pahlish's etsy site if you live in the US.

How do you avoid shrinkage?

Tuesday, January 29, 2013

Oldie but Meh-y: Crows Toes Kat Nip

Holy crap, guys!  O.o  I've almost hit 900 blog followers.  That is AMAZING and far beyond what I ever thought would happen when I first started my little blog.  Thank you for being here!  <3  Feel free to send me suggestions and requests, and I'll do my best to incorporate what I can.  In other news, I have an appointment with an allergist tomorrow.  I'm pretty sure I've been dealing with an allergy issue for the past month, or maybe even longer, so I'm actually looking forward to being poked and prodded tomorrow.  Sorta.  Anyway, because I've been feeling a bit under the weather, I'm hauling out some pre-edited photos, which were taken during my first big stash slash last summer.  Basically, that means that you're going to see photos that aren't that great in quality, have some severe nubbins and not so great cuticles, and truncated reviews due to a lack of proper photos.  If you can bear with me the rest of this week, I promise you'll be glad you did.  Next week, I'm really looking forward to showing you some gorgeous polishes - both indie and mainstream.  Anyway, let's get to the polish for tonight!

Tonight, I'm going to show you Crows Toes Kat Nip.  Kat Nip is a green and gold glitter bomb with glitters all the same size (around .008 or .15).


It's a super sparkly glitter bomb, but way too thick for my taste.  It was so hard to apply for me.  It was clumpy and junked up the opening of my bottle after every brush dip back into the bottle.  Plus, it was so ridiculously topcoat hungry that it required two coats of Seche Vite, which shrank something fierce.  Lastly, it chipped relatively quickly.  Granted, I didn't do my normal wear test on this guy, so I can't really comment on how long it would wear under normal conditions (with Bonder basecoat and non-quick dry topcoat).


Check out the macro.  Can you tell how clumpy it is?


While this polish is a pain in the butt to apply, it is quite pretty.  I imagine that it would be even prettier as one coat over colored undies, but I didn't get any pictures of that.  Further, I'm sure that it would apply more easily with thinner, but again, I didn't test that.

Kat Nip is an exclusive shade made for Overall Beauty, and it's currently on sale!

Do you have Kat Nip?  Do you like it?  What's your favorite way to wear it?

Monday, January 28, 2013

Oldie but Goodie: Color Club Otherworldly

Thank you all for the well wishes.  I've been sick for a month now, but we're working to figure out what's wrong with me.  Hopefully, I'll be on the mend soon!  In the meantime, since I'm not feeling 100% tonight, I'm going to show you an Oldie but Goodie that I swatched last summer: Color Club Otherworldly.  Since this is from last summer, I'll be going back to the old review format tonight as I don't have all of the pictures for a proper review.  Sadly, I sold this little bugger, so I can't take more pics.  Anyway, let's take a look see!

Otherworldly is from the summer 2011 Color Club Starry Temptress collection.  It's a bright royal blue crelly polish with white matte glitters.  It's not as squishy as a jelly, but it's not as opaque as a creme.  It builds well in just a few layers.


It applied easily, flowing from the brush without dragging or clumping.  It didn't pool on my cuticles, either, which was nice.  I needed relatively little cleanup, and it didn't shrink with my Seche Vite.


As you can see from the blurry shot, the glitters are completely matte.  I would've liked this polish much better if it had holographic or regular metallic glitters.


And, here's the obligatory macro shot.


You can still find this polish in those box sets at Ross, but it has, technically, been discontinued.  I was also able to find several at salons while dusty hunting.  Well, it's time to get back to veging on the couch while watching some Arrested Development.  Have a great night, all!

Meh, sorry for the crappy quality, but I <3 their chicken dance.

Do you like the matte white glitters in the Starry Temptress collection?

Friday, January 25, 2013

Share the Love Giveaway Prize 3: Blue-Eyed Girl Lacquer You are NOT Alone

Well, time to show you guys my last prize for the Share the Love Giveaway!  Remember, you can enter here for a chance to win lots of amazing things from lots of amazing bloggers.  In fact, more bloggers have been added to the giveaway, so the odds are better for you to win!


Heh, sorry.  Oods are just cool.

ANYWAY, back on topic!  You are NOT Alone was a polish I made as sort of a nod to battling depression.  I've discussed this many times, but I suffer from severe clinical depression and anxiety disorder. It's something I'm very open about because I find that telling my story has helped others realize that they aren't suffering alone.  Sometimes, that's a very hard fact to remember.  If you ever feel alone and would like someone to talk to, my email is always open.  Enough of the serious stuff, let's get to the pretties!


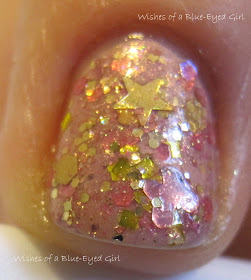
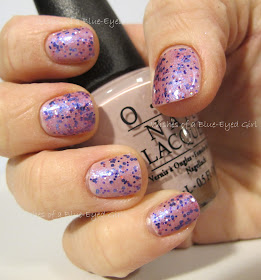
Since this is a polish I made, I'm not going to do a normal review.  Instead, I'll try to showcase this bad boy in a few different ways.  You are NOT Alone is a milky pink based polish chock full of pink and copper shimmer, pale pink and gold hexes in various sizes, pink and gold holo hexes, lime-gold squares, pale pink circle glitters, holo pink butterflies, and holo gold stars.  The large glitters are actually really easy to get out of the mini bottle, which is why you're able to see so many in my swatches.  They came out easily and spread well.


In this first picture, I have YANA with one coat alone on my thumb, three coats alone on my index and middle fingers, one coat over OPI My First Knockwurst on my ring finger, and one thick coat over Deborah Lippmann Dancing in the Sheets on my pinkie.

Here are closeups.

One layer alone.


Three layers alone.


One layer over My First Knockwurst.


One layer over DL Dancing in the Sheets.

Next, take a look at one coat of YANA over five (yes, you read that right...) coats of Essie Pink-a-boo.  I'll have a review of Pink-a-boo probably next week.


Lastly, you can check out swatches done by the lovely Lacey of My Boyfriend Hates Makeup.  So, there you have it!  As always, my lacquers are not for sale.  I make them as a hobby, but I try to share them with you guys when I can.  There is a possibility that I may sell a limited number of these polishes to help raise depression awareness with proceeds going to a research and awareness group (which I haven't really researched yet, so that's up in the air).  When and if I make that decision, I'll definitely let you guys know.

What's your favorite milky pink based polish?

Thursday, January 24, 2013

Comparison Thursday: Galaxy Nails in a Bottle

Today's Comparison Thursday is a special one.  It's one of my new absolute favorite polishes plus a polish that is so highly sought after that it's kinda crazy.  I bring to you Comparison Thursday: Galaxy Nails in a Bottle Edition - Picture Polish Cosmos and Essie Starry Starry Night.

Both polishes are a dark deep blue with flecks of glitter that remind you of a night sky.  Essie's Starry Starry Night is a deep navy blue jelly with silver micro glitters.  Picture Polish Cosmos is a deep royal blue jelly with irregular holographic glitters.  Both have such a gorgeous depth, but they aren't actual duplicates.

Here they are together.


The bottle shots will show you a little how they look.


Here they are side by side.


Here they are blurry.  In this shot, you can clearly see that Cosmos has holo glitters whereas SSN has silver.  


Cosmos


Cosmos is a deep royal blue jelly with irregular holographic particles, and is lighter than Starry Starry Night.  The application was amazing, and the color was so ridiculously pigmented.  There wasn't any pooling, the polish flowed smoothly, and it really only needed one coat for opacity.  On my thumb in the photo above, I only have one coat of Cosmos.  The rest of these shots have two coats of Cosmos.  I couldn't accurately capture the sparkle and depth, but it really is something special.  The light catches it at different angles, which produces varying effects.  This has definitely jumped into my favorites list.  The wear is a little lackluster, but I attribute that to wearing Rejuvacote and Seche Vite instead of my normal super-stay combo of Bonder and OPI black label topcoat.  I'll have a proper review of this up next week.  The dry time was quite surprising.  The layers are pretty thin, so it only took a few minutes to dry without a quick dry topcoat.

Starry Starry Night


As you can see from the photos above, Starry Starry Night is significantly darker than Cosmos.  Further, the glitter in SSN are small silver hexes.  This polish is so old that it doesn't even say Essie on the bottle other than on the bottom label.  The smell was a little gross, but I'm not sure if it's the polish or something the salon I bought it from may have added to it.  I found this little gem at a salon nearby and immediately snapped it up despite the fact that it had maybe less than 1/8 left.  I added a bit of thinner, and it was good as new!  I could have probably added a little more thinner, though, as these two coats were the slightest bit goopy.  It also took a little while to dry.  The effect is quite pretty, but I think I like Cosmos better.  The silver isn't overpowering, so there's a nice balance between jelly and glitter.  I haven't worn this on its own yet, but I plan to soon.  I'll have a full review up at that time.


So, there they are!  Starry Starry Night is a deep navy blue with silver glitter, and Cosmos is a deep royal blue with holographic glitters.  While they are different, I think that Cosmos would easily kill any SSN lemming that you may have.  The formula was much easier to work with than SSN, and the color is just so rich.  You can purchase Picture Polish, an Australian brand, at Llarowe, Overall Beauty, and Harlow & Co. If you're looking for SSN, you'll need to scour your local salons to see if someone has a bottle they don't want anymore.

Which is your favorite?  Does Cosmos kill your SSN lemming?

Wednesday, January 23, 2013

Share the Love Giveaway Prize 2: Revlon Girly

I'm sure you guys are getting tired of hearing it, and I'm getting really tired of saying it, but I'm sick again.  Low grade fever, sore throat, general yucky feeling.  This is seriously getting very old very quickly.  That being said, this will be a quickie tonight.  Let's take a look at Revlon Girly, which is prize number two of my prize pack for the Share the Love Giveaway.

Bottle Shot

Blurry to see the holo

Color: Dusty pink jelly with purple, fuchsia, and peachy pink glitters that have some holo.

Finish: Glitter Jelly – glitter in a colored jelly base.


Bottle / Brush: Revlon brush – standard length wand and brush for average application.


Opacity: Medium – achieves opacity at three to four coats, but looks much better as one coat over undies.

Glitter Application: Hard – glitters come out of the bottle easily, spreads well with the dab method, but is so thick it's hard to spread evenly, and bubbles when dry.


Consistency: Thick – thick and clumpy, but should be easily remedied with some polish thinner.  I haven't thinned mine yet, but as you can see from the brush shot, it's pretty clumpy.  I ended up using Nail Pattern Boldness Glitter Food and a thick coat of Seche Vite to get it smooth.

Overall Ease of Application: Hard – clumps, and streaks on first and second coat.  Does not spread well without massive manipulation.  Requires quick work to get a smooth result.

Stampability: Not designed for stamping.

Dry Time: Long – dry to the touch with minimal smudging in over 15 minutes. I don't know if it was all of the coats of Girly itself or the addition of two top coats that made this guy take so long to dry, but it was impossible.  It smudged and got sheet marks well after application.

Overall Thoughts: I'm not really decided on this polish.  On the one hand, it's really pretty.  On the other hand, I had some serious problems with the formula.  It was extremely clumpy!  I like how the mainstream brands are attempting glitter bombs, but they simply don't understand how to formulate a polish with nice consistency and enough glitter.  Here, they tossed in so much glitter that it was hard to get enough base on the brush to spread it all around.  You can tell how clumpy it is from the brush shot alone.  Using more than one coat definitely made it much worse.  The solution?  Use it as a top coat on top of colored undies.  The photos below are one coat of Girly over Elevation Colline du Charf.  Then, I matteified it.  Not only was application much easier since I wasn't going for full opacity, but it also looked a lot nicer.

One coat over Elevation Colline du Charf with Seche Vite Topper


Now, mattified.


You can purchase Revlons at drug stores and other beauty supply shops.  I managed to grab the last two Girly's from my Ulta.  Or, you know, you could win it in the Share the Love Giveaway...  Just sayin'.

Which of your glitter polishes has the best formula?

Monday, January 21, 2013

Share the Love Giveaway Prize 1: Kelara My One and Only

Wow, this giveaway has kinda blown up my blog and Facebook.  This is insanity!!  Awesome, but crazy, you know?  Anyway, welcome to the new readers!  I'm glad to have you aboard!  Feel free to chat with me about anything.  Constructive criticisms, suggestions, and requests are always welcome.  Take a poke around, check out what I do, and tell me what you think!

Anyway, let's get down to business!  When Shelly (from Shelly's Sassy Nails) asked me to join in on the Share the Love Giveaway, I knew exactly what I wanted.  I wanted a mainstream polish that has been a bit hard to find.  I wanted to make one of my own polishes, so I chose one that got a lot of compliments.  Lastly, I wanted a custom made especially for this giveaway.  I decided to see if Kelara would be awesome enough to create something for us, and this is what they came up with.  Get ready for some serious picture spam.  As always, click on the pictures to make them bigger.

My One and Only

Tara describes this polish as: light pink/purple-ish base with some pink holo glitter, purple hex glitter in two sizes, pink shimmer, and a touch of clear iridescent glitter.   Although, I would add that the purple shimmer tends blue at angles.  


The photos in the review portion of the post are over OPI If You Moust You Moust, OPI Alpine Snow, Jelly Sandwiched under OPI Don't Touch my Tutu, and Sally Hansen Xtreme Wear Black Out.  I'll have a review of If You Moust You Moust later.


Bottle Shot

Blurry shot to show the holo yumminess.


Color: Purple-ish pink with purple and blue shimmer, purple and pink glitters.


Over Black Out - notice that gorgeous purple/blue shift?
Finish: Glitter Shimmer – glitter in a base that shimmers in the light from either the use of a certain pigment or micro glitters.


Ignore my horribly stained thumb...

Bottle / Brush: Round mini bottle – wand and brush are just long enough to reach the bottom of the bottle.  However, the fact that it’s a mini makes application a little tricky.  Requires a steady hand to apply evenly without getting polish on your sidewalls.

Three coats of My One and Only alone.

Opacity: Medium – achieves opacity at three coats but also works great at one coat over opaque undies.

Over If You Moust You Moust
Glitter Application: Easy – Spreads evenly without much manipulation.

Over Alpine Snow
Consistency: Medium – applies easily and doesn’t flood the cuticles.  Although, if you keep the bottle open long enough (i.e. for 4 different undie changes with photos), it does get a little thick.  A little bit of thinner will help that along, but won't be necessary if you're only applying one mani at a time.

Jelly sandwich with Don't Touch My Tutu
Overall Ease of Application: Easy – applies well without pooling, dragging, streaking, or balding.  Spreads evenly and smoothly.

Stampability: Not designed for stamping.

Dry Time: Medium – dry to the touch with minimal smudging in 3-8 minutes.

Overall Thoughts: I'm so impressed by Kelara Lacquers.  This is the sixth one I've worn, and I really love their uniqueness and formula.  I spoke to them after my last round of reviews about the thickness of their polishes, and it appears that they fixed the issue.  Keep in mind, my bottle did thicken up a little bit as I was applying my fourth or fifth mani.  For normal usage, though, the thickness should be fine without any need to add any thinner.  For the most part, My One and Only applied easily, and I was extremely pleased with how well the glitter spread on their own.  I was able to control whether I had thick or sparse glitter coverage, which isn't something you can always do with most polishes.  The coverage on its own was fantastic as well.  It wasn't so thick that it became unruly with multiple coats like some glitters.  Sadly, My One and Only is just that - the only one.  I have a mini bottle just so I can show you guys what this baby looks like, but otherwise, this is the only bottle Tara and Kellen will make.  Who doesn't love limited editions?

Let's take a look at My One and Only over various undies.

Over Girly Bits Jelly Shoes


Over OPI My First Knockwurst


Over China Glaze Spontaneous


Over OPI Wing It


So, there you have it!  Remember, if you would like to win My One and Only, you'll need to enter into the Share the Love Giveaway.  I highly recommend contacting Tara and Kellen if you need a custom.  They had great communication, listened to what I needed, and were quick to send me their progress.  Otherwise, you can purchase Kelara Lacquers at their website and their Etsy store.  Follow them on Facebook and Twitter for news and announcements.

Have you ever had a custom made?  If yes, by whom and what does it look like?