Showing posts with label Shimmer Polish. Show all posts

Wednesday, November 13, 2013

Shimmer Polish Jasmine

Well, now.  I'm finally getting back to one of the Shimmer polishes I was sent for review a few months ago!  I thought I'd pepper them over the next couple of months so you guys get a good hit when you least suspect it!  Haha!  Tonight, we're going to check out Shimmer Polish's Jasmine!  The color in the bottle kinda sorta reminded me of my favorite Jasmine, Princess Jasmine from Aladdin!

Isn't she purdy?


Ok, ok ok.  I'll stop bothering you with gifs now and get back to the polish...


*I was not financially compensated for this post. I received a sample for review purposes. The opinions are completely my own based on my experience.  For more information, please see my Disclosure Policy in the tab above.* 


Color: Clear base with teal, copper, gold, and pops of blue and red glitter.
Finish: Glitter Top Coat – glitter in a clear base to be worn as a top coat.


Bottle / Brush: Round bottle – the brush and wand are the standard width and length.  Easy to control and manipulate.


Opacity:  Glitter topcoat – not designed for full opacity.  HOWEVER, I'm pretty sure that this bad boy is dense enough to apply three coats for full opacity.  Granted, you'll have to deal with the fallout of having to scrub off three heavy coats of glitter.  So yeah, up to you...
Glitter Application:  Medium – requires the dab method, but glitters are easy to extract and spread evenly.  It only required the dab method because the base was just so densely packed with glitter.


Consistency: Thick – thick or it can be clumpy, but is easily remedied with some polish thinner.
Overall Ease of Application: Medium – applies well with minimal clumping, dragging, or balding.  Spreads well without much manipulation.


Stampability: Not designed for stamping.
Dry Time: Quick – dry to the touch without smudging in under 3 minutes.


Overall Thoughts:  Yeah, this polish was a surprise for me.  In the bottle, I wasn't sure how much I was going to like it as I'm not the type to typically go for golds, but as soon as it was on my nails it was looooove.  I can't wait to try it over a cream or white.  Here, I've worn it over Indigo Bananas Immortal Game, which is where the pink flash comes from.  Application was easy for such a densely packed glitter.  The glitter to base ratio for this is strongly in favor of the glitter over the base.  The dab method worked perfectly with just enough glitter coming off of the brush and onto the nail.  All in all, I really like this polish way more than I thought I would.  I'm starting to see a trend here!  Cindy has made me fall in love with golds and coppers, which I didn't think could ever happen!  So, hustle on over and grab yourself a bottle!

You can purchase Shimmer polishes for $12 from Cindy's Etsy store, or here are instructions for how to email her your order. Follow her on her blog, Facebook, Twitter, and Instagram for news and updates.

*I was not financially compensated for this post. I received a sample for review purposes. The opinions are completely my own based on my experience.  For more information, please see my Disclosure Policy in the tab above.* 

Friday, October 25, 2013

Guest Post: Adventures in Polishland with a Geometric Glitter Mani

Happy Friday from Adventures in Polishland! I'm so excited to be writing for Wishes of a Blue-Eyed Girl today. I thought it would be fun to put a spin on my favorite nail art look, and create a fall-inspired, geometric glitter manicure. While I typically rock light-toned hues, when the weather turns cold I grab the darker polishes. Let me share the edgy manicure I created!

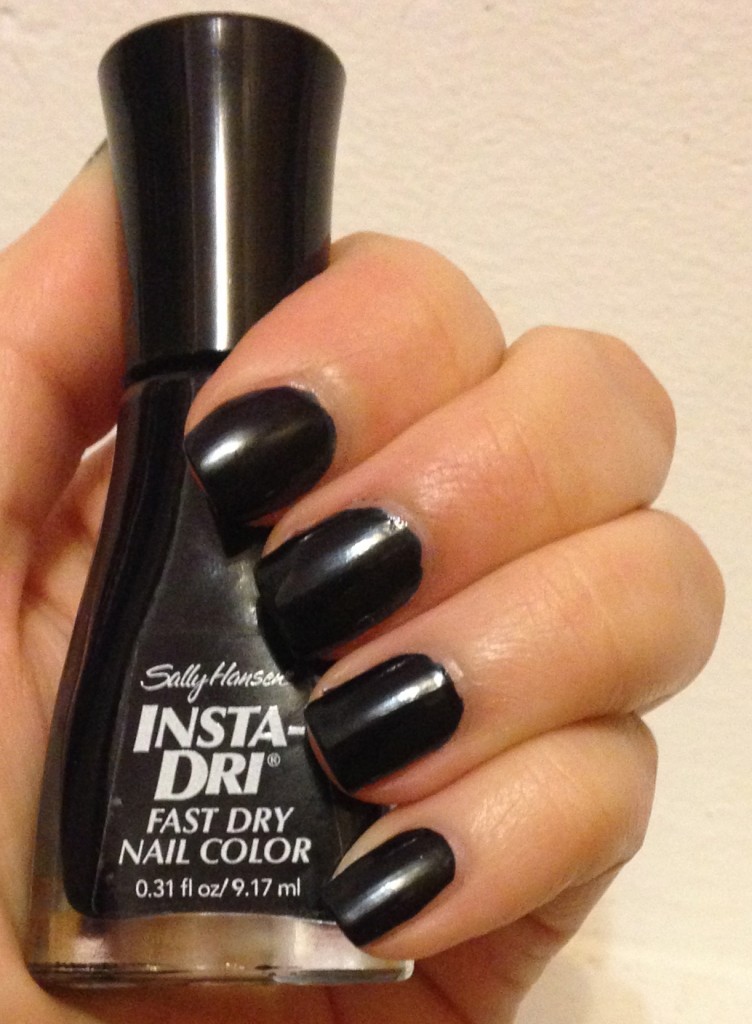
  IMG_3411

I began with Sally Hansen Insta-Dri in Night Flight, a dark blue polish that looks almost black. Night Flight has a perfect formula that is opaque in two coats. The fast-drying formula is also perfect for a geometric manicure because I am too impatient to wait for anything else to dry. After about five-ten minutes, I was ready to grab the scotch tape and get to glittering!

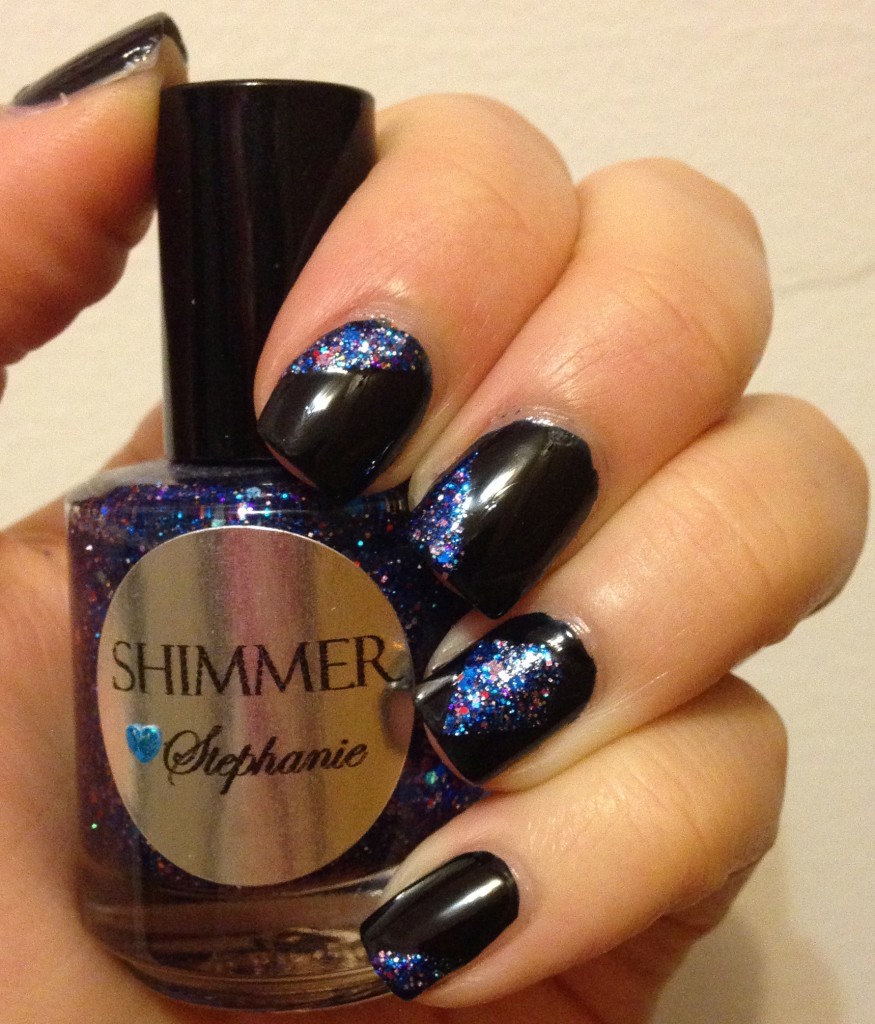
  IMG_3413

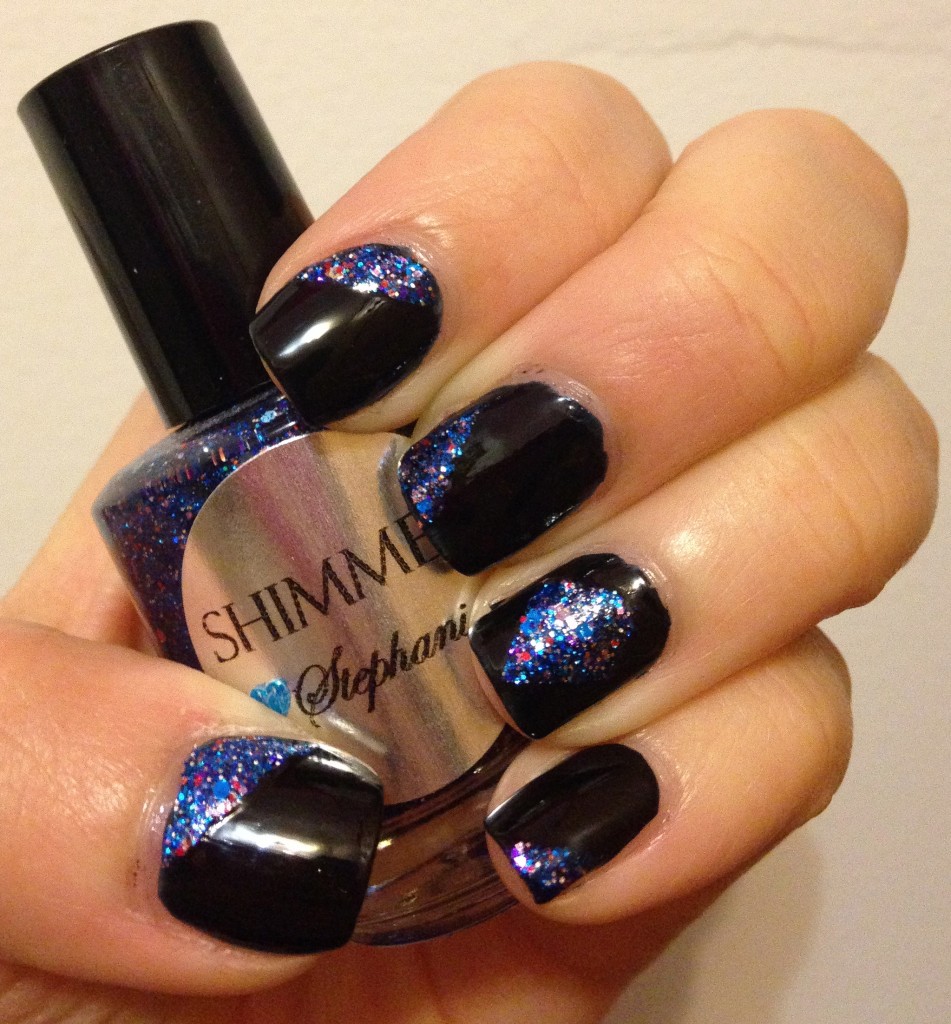
IMG_3416

To create a geometric look, I decided to place a diamond on my ring finger as an accent, and then rotate triangles on my other nails. All you need is tape to achieve this look! Simply place the tape where you want the design to be, apply your glitter polish, and peel off the tape while the polish is still wet. I used Shimmer Polish in Stephanie since the colors really complimented Night Flight. Plus, Shimmer Polishes are quite densely packed, so I knew the glitter would be opaque!

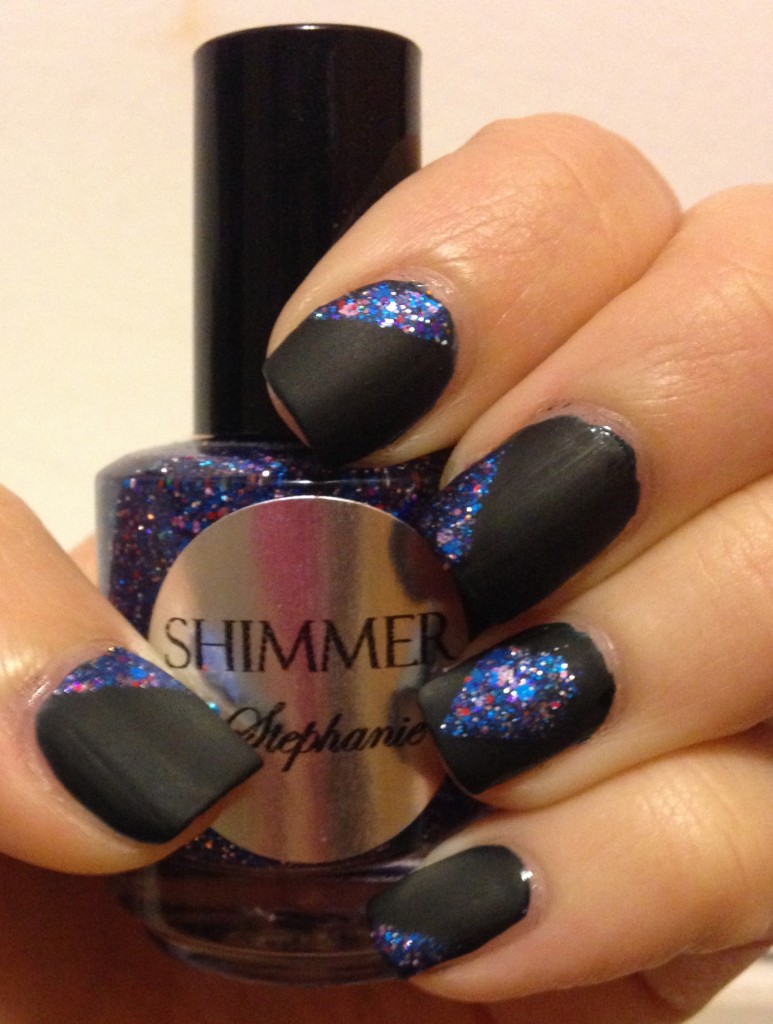
  IMG_3417

As a final touch, I added a matte top coat to my manicure. I just love the look of matte glitter! It really makes the glitters pop, and it makes the color portion look like vinyl. I used butter LONDON Matte Finish, but any matte top coat will do! Of course, you can use a glossy top coat if you prefer. And that is my complete geometric glitter manicure for fall! This nail art technique is so easy to create, and you can customize it to your own tastes by using different colors, glitters, and designs. The possibilities are endless! If you liked this look, please head on over to my blog Adventures in Polishland for everything nail polish and beauty. I would love to see you there!

_________________________________________________________________________________

Thank you again, Christina, for taking over my blog for the day!  Wow, that is a suuuuuper cool look  that I think I could actually pull off!  You guys know me and my lack of artistic tallent, but this is super pretty and seems like it wouldn't be too difficult to do!  Make sure you go follower Christina at Adventures in Polishland!

Wednesday, September 4, 2013

Shimmer and a Blue-Eyed Girl Lacquers Sneak Peek!

Tonight's post will be of the shorter variety.  I got busy tonight and almost forgot to post!  Tonight, I'm going to show you a Shimmer Polish that is just simply stunning.  I'm also going to show you one of the polishes from my new collection, available to the public (Finally, I know right?!) this Friday!  Let's take a look at Shimmer Leslie over Blue-Eyed Girl Lacquer Love Makes You Do the Wacky!

*I was not financially compensated for this post. I received a sample of Shimmer Leslie for review purposes.  All other polishes in this review were purchased by me for my own use.  The opinions are completely my own based on my experience.  For more information, please see my Disclosure Policy in the tab above.* 

Shimmer Leslie


Color: Clear base with purple and blue holo hexes and squares.
Finish: Glitter Top Coat – glitter in a clear base to be worn as a top coat. HOWEVER, this bad boy (girl?) is so densely packed that you probably could use two or three layers and achieve full opacity.


Bottle / Brush: Round bottle – the brush and wand are the standard width and length.  Easy to control and manipulate.


Opacity: Glitter topcoat – not really designed for full opacity.  Although, like I said above, you could definitely layer it over itself for full opacity.  If you choose to go that route, though, be forewarned that removal will be much more difficult.


Glitter Application: Medium – requires the dab method, but glitters are easy to extract and spread evenly.  Here, I did an easy gradient over my tips, so the dab method was definitely necessary to place the glitters where I wanted them to go.
Consistency: Medium – applies easily and doesn’t flood the cuticles.


Overall Ease of Application: Easy – applies well without pooling, dragging, streaking, or balding.  Spreads evenly and smoothly.
Stampability: Not designed for stamping.


Dry Time: Medium – dry to the touch with minimal smudging in 3-8 minutes.


Overall Thoughts:  Leslie is seriously a gorgeous polish.  Out of all of the Shimmers I have, it's my top favorite.  That's saying something, too, because I freaking ADORE Julie.  No bias there at all...  Nope.  Leslie, though, is the perfect mix of my favorite polish colors - purple and blue.  Plus the holo bits really give it some depth.  Application was so easy.  You can go more sparse by brushing the polish across your nail or more dense by using the dab method.  Dry time was average.  I really love the way this looks over my purple holo!

Blue-Eyed Girl Lacquers Love Makes You Do the Wacky!


Here are a few quick shots of one of my new polishes in the Once More with Feeling collection that will be available on Friday!  I'll have ordering details at the bottom of this post.  This collection is based off of the Buffy the Vampire Slayer television show, focusing mostly on their high school years.  Here's a look at Love Makes You Do the Wacky, which is based off of Willow Rosenberg, the most powerful witch in the Buffy-verse.


Wacky is a light purple holo with a bright fuchsia flash.  You can see that flash the best in the photo below.  It's actually much stronger in person.  I took this photo under the light of my icemaker.  Yes, sometimes I use the most ridiculous light sources, which garners some strange looks from the hubby.


It's on the sheer-er side, but I only needed three coats without undies for full opacity.  Dry time is average, and application was better than mainstream holos as it doesn't drag or bald.  So, what do you think?  Are you as excited about my new collection as I am?

You can purchase Shimmer polishes for $12 from Cindy's Etsy store, or here are instructions for how to email her your order. Follow her on her blog, Facebook, Twitter, and Instagram for news and updates. You can purchase my core collection now at my order form here, and for photos, you can check out what's already available for sale here. Also, follow my new line's Facebook page here for news and updates. You can also access the order form in the tab at the top of my Facebook page. The Once More with Feeling collection will be added to the order form on Friday. There won't be any cart jacking, so no need to rush! I'll have a special post on Friday with all of the lacquers available, so keep an eye out for that! Also, please note that since this is an order form system, there may be a slight delay from the moment of submitting your order to the moment of receiving an invoice. I send invoices as soon as I reach your order in the queue. Check out more photos from the rest of the collection here!

*I was not financially compensated for this post. I received a sample of Shimmer Leslie for review purposes.  All other polishes in this review were purchased by me for my own use.  The opinions are completely my own based on my experience.  For more information, please see my Disclosure Policy in the tab above.* 

Monday, July 29, 2013

1 Year Blogging - a day of Julies.


Well, it's been 1 year of blogging as of today. I can't believe how rewarding and fulfilling it has been to share my passion with you guys. I truly appreciate each and every interaction I have with you guys, so thank you so very much for joining me in this journey.

First, I wanted to remind you guys of all of the giveaway goings-ons around here! First, don't forget to enter the GIANT 1 Year Blogiversary Giveaway. The prizes are listed here and entry is via the Rafflecopter widget at the bottom of the post. Second, don't forget about the IG portion of my 1 Year Blogiversary Giveaway. Check that out here. Remember, you must share the photo (easiest to take a screenshot and post it yourself) and use all of the tags or I won't see it. If you've entered and haven't received a response from me that looks says "#woabeggiveawayentry xx," then I haven't seen your post and you'll need to make sure all of the hashtags are present. Both of theses giveaways end at 11:59 pm est Monday, August 5, 2013. The third and final giveaway, for today at least, is the Reader of the Month giveaway. Today's challenge is a guessing game! Check out my post on Facebook here for information. It closes tomorrow, 7/30, at noon est.

Alrighty, let's get down to business! Tonight I want to share with you another one of my favorite manis to date. It oozes pastel femininity, which is a nice palate cleanser from the bold and vampy colors I've been sporting lately. Also a bonus, two of these polishes just happen to share my name! Let's take a look at Zoya Julie and Essie Mint Candy Apple topped with Shimmer Julie. The photos without the HK Girl bottle are matte and the photos with it plus the macro of Julie over, well, Julie are shiny.


*I was not financially compensated for this post. I received a sample of Shimmer Julie for review purposes.  All other polishes in this review were purchased by me for my own use.  The opinions are completely my own based on my experience.  For more information, please see my Disclosure Policy in the tab above.*

Shimmer Julie


Color: Multi-color glitter bomb that favors gold, purple, and blue mini and small hexes with accents of green, red, silver, and caramel hexes.
Finish: Glitter Top Coat – glitter in a clear base to be worn as a top coat.
Bottle / Brush: Round bottle – the brush and wand are the standard width and length.  Easy to control and manipulate.
Opacity: Glitter topcoat – not designed for full opacity.


Glitter Application: Medium – requires the dab method, but spreads evenly.
Consistency: Medium – applies easily and doesn’t flood the cuticles.
Overall Ease of Application: Easy – applies well without pooling, dragging, streaking, or balding.  Spreads evenly and smoothly.
Stampability: Not designed for stamping.
Dry Time: Quick – dry to the touch without smudging in under 3 minutes.


Overall Thoughts: When I first received this polish for review, I was worried that I wouldn't be able to find any undies that would do it justice. I didn't want to overwhelm the mani by having a bright and in your face undie when the topper already had a ton of vibrant colors. I think it worked really well over the pastel undies. Application was so easy. It's so densely packed that the glitters came out easily but required the dab method to spread across the nail evenly. I loved this mani so much that I wore it for several days. That's saying something since I usually change my mani every day! As you can see, I actually wore it matte the first day, which was absolutely gorgeous. I used NYC Matte Me Crazy, which is as good as Essie Matte About you but for 1/4 of the price. You can purchase Shimmer polishes for $12 from Cindy's Etsy store, or here are instructions for how to email her your order. Follow her on her blog, Facebook, Twitter, and Instagram for news and updates.


Zoya Julie


Color: Lilac with silver shimmer.
Finish: Shimmer – a polish that shimmers in the light.
Bottle / Brush: Tapered bottle and cap - bottle tapers from a fat top to a smaller bottom making it a little harder to hold if you hold your bottles while you paint.  The tapered cap actually makes for easier application as it's shorter than most caps, but provides enough length to help guide application without being too wide where you grip it.  The wand and brush are a little short, but they have average application.


Opacity: Medium – achieves opacity at three to four coats.
Glitter Application: N/A
Consistency: Thick – thick or it can be clumpy. The polish requires more than 2 coats, but it hits its max thickness at 2 coats. Meaning, it looks a little lumpy at more than 2 coats, but you have to use more than 2 coats to keep it from showing bald spots. Catch 22, much?
Overall Ease of Application: Difficult – pools at the cuticles.  Drags and clumps, streaks, or is bald in spots.  Does not spread well without massive manipulation.  It is quite thick after applying sufficient coats for full oppacity.
Stampability: Not tested for stamping.
Dry Time: Long – dry to the touch with minimal smudging in over 8 minutes due to the thickness required for opacity.


Overall Thoughts: It's such a pretty color, but I was so disappointed by the application. Of course I'm going to keep it because 1) it's my name, duh, and 2) I really want to try it again after some thinner. As I've mentioned above, the polish became super thick on the nail after applying enough layers to reach full opacity. Plus, it got thicker on the brush as I completed my mani. All in all, it's so pretty that I'm going to attempt to use it again before giving up. I purchased Julie during one of their online promotions here. However, you can purchase Zoya at Ulta, Salons, and other beauty supply stores where they are sold.


Essie Mint Candy Apple


Color: Mint green.
Finish: Crelly – looks squishy like a jelly but opaque like a crème.
Bottle / Brush: Essie square - bottle is square, which is easier for me to hold in my hand or between my legs as I polish.  The cap is shorter than most salon brands, other than Zoya, but it is easy enough to hold.  The wand and brush are average with the brush being more on the narrow side.  Application is a little more difficult than normal due to the slender brush.
Opacity: Medium – achieves opacity at three to four coats.
Glitter Application: N/A


Consistency: Medium – applies easily and doesn’t flood the cuticles.
Overall Ease of Application: Hard – applies with some streaking and balding.  Requires sufficient time between coats to ensure no balding. However, it requires quick work per nail to get a smooth result.
Stampability: Not tested for stamping.
Dry Time: Quick – dry to the touch without smudging in under 3 minutes.


Overall Thoughts: I really enjoyed working with this polish, which was a random act of kindness gift from my friend, Samantha. Application was a little difficult as you had to work fast to get enough polish on the nail before it dried and caused a dragging situation. Furthermore, it required three coats to avoid streakiness. Once it was all said and done, though, it dried quickly, which is a huge plus. This is also a perfect mint green for my skin tone - and for Shimmer Julie! You can purchase Essie's at most drug stores, Target, salons, and beauty supply stores.

So, there you have it! Thank you again for coming on this journey with me. I am truly thankful for each and every one of you!

*I was not financially compensated for this post. I received a sample of Shimmer Julie for review purposes.  All other polishes in this review were purchased by me for my own use.  The opinions are completely my own based on my experience.  For more information, please see my Disclosure Policy in the tab above.*