Showing posts with label Emerald and Ash. Show all posts

Thursday, September 18, 2014

Comparison Thursday: Periwinkle Holos


As I was working through my stash trying to find things to sell (because I seriously need to downsize asap), I realized I have a ridiculous number of light blue, medium blue, and periwinkle holos.  It's almost insane.  So, I broke them down into several comparisons so I could work through them bit by bit.  Here's the first of those comparisons tonight!  Make sure to click on the photos to see them in greater detail.

[Purchased by me or given as gifts by friends.]

The polishes included in this comparison are: Enchanted Polish Keep Watch, Model City Polish October Sunset, Emerald and Ash Trick, Girly Bits Bachelor's Button, and Darling Diva True Blue.


Four out of five of these polishes are very close in shade and have a little added extra to give them some depth and oomph.  However, none of them are exact duplicates.  Let's check out the differences below.  I have used one coat of KBShimmer's Clearly on Top for all of these photos.  Most are taken in full sun, but one is taken in outside shade.

Thumb: Keep Watch


Keep Watch is definitely the darkest and most purple of the grouping.  As such, it's a bit of an outlier in that it's not really periwinkle.  The consistency was great - it was a bit thick but self-levels.  Application was also easy, so there wasn't any balding or streaking.  It was almost fully opaque in one coat, but it did need that second  coat to completely cover.  This polish was a special limited edition created for Mishka NY, and I'm not sure if it'll ever be coming back.  But you can buy other Enchanted Polishes at her store.


Index: October Sunset


October Sunset is definitely a proper periwinkle.  It seems more silver than the others, which I attribute to the larger holo particles.  It's also got a lovely blue flash.    The consistency is sheer, but it's not too thin or runny.  It also required very little cleanup.  It's closest in color to Trick, but they're not exactly the same color.  In the shade, it looks like an exact dupe to Trick, but, as you can see, they are quite different in full sun.  I used three coats for full opacity.  Sadly, October Sunset has been discontinued, but you can purchase other Model City Polishes here.


Middle: Trick


Much like October Sunset, Trick is a true periwinkle.   Also like OS, it has the same size holo particle, which gives it a silvery look.  However, it has a pink flash instead of the blue flash you see in OS.  Trick is sheer but easy to apply and required no cleanup required.  I used three even coats for full opacity.  You can purchase their polishes at their store, but it's closed until 10/1/2014.  So, make sure to follow their Facebook page for news and updates!  I know that Trick was a limited edition, but I'm not sure if it's completely gone yet.


Ring: Bachelor's Button


Bachelor's Button is very blue in comparison to the others.  It's probably the second most deeply pigmented of the group after Keep Watch.  It's got smaller holographic particles, which means that the base color shines through a little more than it would with a larger grade of holographic pigment. Much like Trick, it's got a lovely pink flash, but it's several shades darker than Trick.  BB has easy application without the need for much cleanup.  I wore three even coats, but as you can see, it's still got a little visible nail line going on in my photos.  To the naked eye, though, it looked fully opaque.  You can purchase Girly Bits at her store here.


Pinkie: True Blue


True Blue is a bit more blue than periwinkle.  Also, it includes flakies and iridescent glitters, which is different from the rest of the polishes in this set.  TB has super smooth application without the need to do much cleanup.  I wore three even coats for full opacity.  The glitters were smooth, so I only used one coat of KBShimmer's Clearly on Top.  You can purchase Darling Diva at here store here, but True Blue is no longer available.

So, what do you think?  Which is your favorite?  Obviously, I like this color, so I'm not sure I could actually pick a favorite!

Friday, August 15, 2014

Blog 2 Year Birthday Giveaway Prizes Part Two

So, yeah, I'm having to work tonight (still not done, in fact, *sigh*), so this will be pretty short.  There's only about half an hour left before my 2nd year blog birthday giveaway is over!  So, make sure you enter here!  Now, let's take a look at the rest of the prizes!

Lilypad Lacquer I Just Think It's Pink


IJTIP is a bright hot pink polish packed with flakies and holographic glitters.  I only needed two coats, but I probably could've just gone with one coat instead.  Dry time was quick, and application was super easy.  I'm so in love with the vivid brightness of this polish!


Model City Polish Strawberry Jam


I've got a full review of Strawberry Jam here, so make sure to check it out.  I just love how squishy this polish is!  And the sparkle!  Ahh, I love it so much!


Color Club Eternal Beauty


Application for EB was fairly easy and didn't require the use of an aqua base, which is fantastic!  Application was fairly easy and didn't really pool, drag, or bald like a lot of the other mainstream ultra-holos.  I used three coats to ensure opacity, but it only really needed two.  


Emerald and Ash Mie Scattering


Mie Scattering is a white jelly with a subtle holo shimmer.  It's a true jelly, so you'll need to layer it with other polishes to get rid of the nail line.  Here, I used five coats to try and cover up any sheer spots.  It can get a tad thick, so you may need to thin your bottle a little bit.  Otherwise, application was fairly easy without much need for cleanup.  It's my go-to white jelly, and it's just so squishy and gorgeous.  Dry time was average.


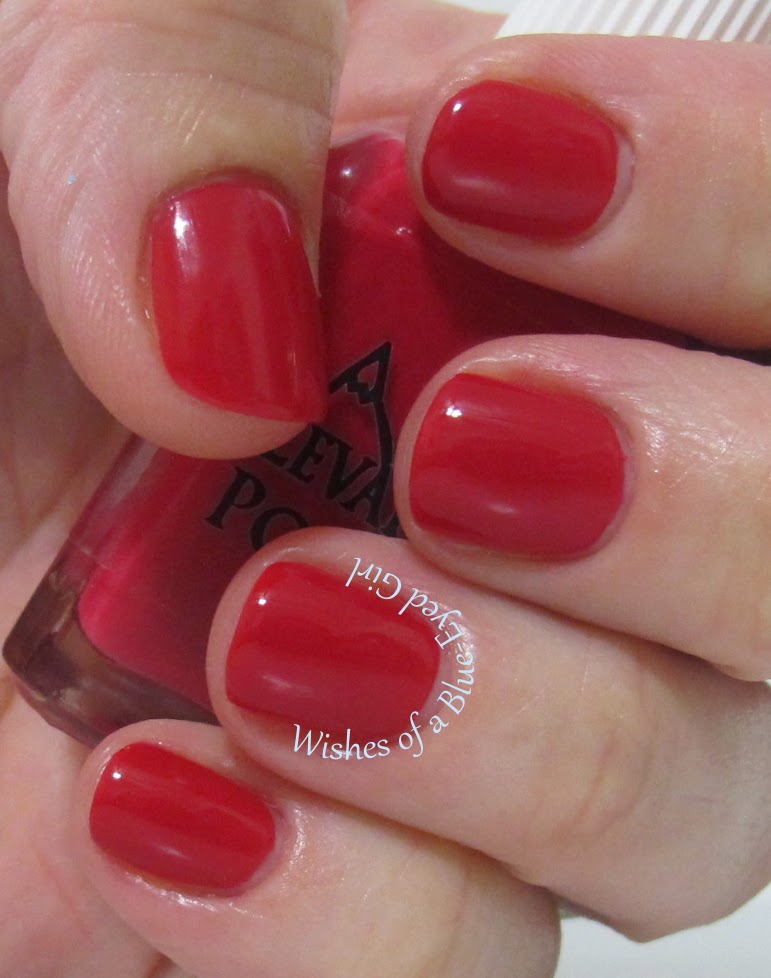
Elevation Polish Ave Secretan


For some reason, my photos are looking a lot more red than it really is.  It's actually a lovely bright pink and not really red.  I love the consistency of this creme, and it applies easily in just two coats, but I used three coats for my photos.  There was a little need for cleanup, but nothing too serious.  Dry time was fairly quick with a quick dry topcoat.


Blue-Eyed Girl Lacquer Hypothermia


You can check out a full review of Hypothermia here.  It was a super limited edition that I released last year as a free gift with purchase of my full winter collection.  It will be back off and on as a free gift with purchase or prizes for giveaways, but it will never be sold individually.

So, there you have it!  Those are all of the prizes for the giveaway!  Which are you most excited about?  I'll have the winners announced sometime tomorrow evening.  Good luck, everyone!

Oh, and if bits and pieces of this post made no sense or were grammatically incorrect, please note that I'm running on fumes here...  I hope to be able to catch up on some sleep sometime in 2015...  ;)

Monday, July 7, 2014

Summer of Untrieds: Week 1

Welcome to my first weekly installment of the Summer of Untrieds Challenge!  If you follow me on Facebook, Twitter, or Instagram, you'll know that I've created a daily challenge for the month of July to get through as many untried polishes on my list as I possibly can.  Because changing my polish every day is pretty ambitious, even for me, I'm going to stick to one weekly post showcasing the week's manis instead of trying to post them every day.  This will allow me to keep certain other weekly features going while I do this challenge (i.e. the return of Comparison Thursday!).  The last challenge I did went pretty well for a while, but I just got so busy and stopped wearing polish for a few weeks.  I know!  Quelle horreur!  I'm determined to keep up with this one, and maybe after the month of July is over, I'll get back to the Crumpet's Golden Oldie Thursdays.  Until then, though, I hope you take the untrieds train with me!  Here are the prompts and the rules:


Rules:

  • Use at least 1 untried polish that fits with the prompt for the day.
  • If you don't have anything that works with the prompt, then consider it a free day and choose a random untried from your stash.
  • There won't be an inlinkz, so keep up with the group by tagging your photos #summerofuntrieds.  I've also been including #julyuntriedchallenge in my posts, so you can add that too if you want.  Also, feel free to add a tag to me if you'd like (either @blueeyedlawyer or #wishesofablueeyedgirl).
  • Start crossing off those untrieds in your stash!

Eventually, I may make a collage of all of the manis for each day's prompts and make an album on my Facebook page or Pinterest.  So, I'll let you guys know if I do that so you can tag yourselves!  Ok, let's get down to the nitty-gritty!  As always, click on the photos to view them in greater detail.

July 1: OPI
I purchased these myself.


For the first day, I wore OPI's Hey Baby and Push and Shove.  I know I'm a bit late on the Gwen polishes, but I haven't really been in the mood for mainstreams lately.  That being said, I have no idea why I waited to wear these.  Holy lord, they are sooooo pretty.  Hey Baby is really a one coater, and application was beyond easy.  I highly recommend it for everyone!  Push and Shove has a great ending effect, but it's a pretty annoying polish to apply.  It reminds me of the Nfu Oh and Layla holos that really needed an aqua base to go on smoothly without balding.  You can definitely see all of the imperfection in my nails, too, so I decided to do a little bit of testing to check out wear and the final application.  On my ring finger of my left hand and pinkie of my right hand, I have 3 layers of Push and Shove over 1 layer of my strengthener, Quimica Alemana Esmalte Endurecedor para Unas (what a mouthful!), and 1 layer of Lay Down that Base. On the thumb, index, and middle fingers of my right I have 2 layers of Lay down that Base topped with 3 of Push and Shove. All have topcoat. The P&S over the strengthener is holding up WAY better than the one over only LDTB and has 0 chips so far while the nails with just LDTB are chipping like mad.  [They say that it's a one-day use polish, which I can totally see if you're wearing it with only LDTB and without a topcoat!] You also can't see as many nail imperfections on the nails over the strengthener!  If you decide to go with a normal base coat underneath LDTB, you should really wait until it and LDTB are completely dry before applying P&S, otherwise it'll drag like mad.  Also, use caution when applying P&S and try not to go over portions that have already been painted until it has dried.  This means you'll need to get a little less polish on the brush and try not to overlap while you're painting.  I was planning to stamp over these, but I'm liking the fresh look they have on their own.  I do wonder, though, how they will stamp!  I'll have to give that a try and report back!


July 2: Glitter Topper
I purchased these myself.


For this manicure, I used OPI Can't Find My Czechbook topped with the ultimate glitter topper - Lynnderella's The Glittering Crowd.  Application of the OPI was pretty easy with only minimal pooling.  It only required two coats and dried fairly quickly.  Unfortunately, this blue isn't exactly super unique, and I'm planning to do a comparison of about 3 other blues in the same range soon.  TGC was fairly easy to apply as well.  It didn't require digging to get the glitters out of the bottle, and it spread evenly without pooling.  The base to glitter ratio was perfect, which can sometimes be a crapshoot with Lynnderellas.  Don't get me wrong, I clearly love me some Lynns, but she tends to pack her bottles so full of glitter that they require the dab method to spread evenly.  This wasn't the case for TGC!


July 3: Creme
I purchased or swapped for these.


I love wearing a creme as much as the next gal, but I get sooooo bored with them super easily.  Plus, since this is a challenge to slash through my untrieds, I wanted to make sure I used more than just one.  As such, I decided to try out some Nail Vinyls from @teismom on IG to go with my cremes.  I've used her stars and chevrons before, but I had some lightening bolts laying around that needed some attention, so I pulled those out for this mani to use with my cremes: Illamasqua Jo'mina (purple), Cult Nails Nakizzle's Shizzle (baby blue), and Illamasqua Cameo (periwinkle).  I didn't exactly think this one through, though, and didn't do them in the correct order.  Oops!  Next time, I'll be more prepared and do them in the right order so that I won't have to do what I did this go around, which was to freehand one of the lines of the baby blue.  Jo'mina was a two coater, but it definitely got all over the skin around my nails, which was sad.  Cleanup was fairly easy, though, without any staining of my skin.  I only needed one coat each of Cameo and NS, but I can't accurately describe their application since I didn't exactly use them for a full mani.  All in all, I still really like this mani despite the imperfections!


July 4: Red, White, and Blue
I purchased or swapped for these.


I wanted to do too many things for my red, white, and blue mani, so I did a bit of a skittle manicure to try and incorporate a lot of the good stuff into the one day I allotted myself for the challenge.  I used Barry M Cobalt Blue on my thumb topped with two coats of Lynnderella Flurries of Starlight.  Cobalt was practically a one coater, but I used two coats for fuller coverage.  I should've used only one coat of Flurries, but I got a little over eager...  As a base for my index, middle, and ring fingers, I used three coats of Emerald and Ash's Mie Scattering, which is my all time favorite white right now with it's crelly texture and subtle shimmer.  On my index finger, I used one coat of Kawaii Lacquer's Aren't the Stars and Stripes a Little... Old Fashioned?, which was super easy to apply with glitters that came out of the bottle easily and spread well on the nail.  On my middle finger, I did a waterfall manicure using Barry M Cobalt, KBShimmer's A Whole Lava Lovin, and Maybeline Silver Gleam.  On my ring finger, I did a water marble using Cult Nails Tempest (white) and Kiss (red) and Barry M Cobalt.  All three were fantastic for water marbling!  I had a bit of trouble with the marble on my swatch hand, but my right hand looked pretty good.  Lastly, on my pinkie I used two coats of Whole Lava Lovin topped with one coat of Lynnderella Sapphire Starfire.  Both were super easy to apply without much manipulation.


July 5: Lynnderella
I purchased or swapped for these myself.


For my Lynnderella day, I chose to use two Lynns: LE Sleepy Holo and core the Stars in Her Eyes, which I wore in one coat over two coats of Chanel April.  I received SIHE in a decant from a friend, and I love those little baby stars!!  For Sleepy Holo, I used two coats of this amazingly full coverage glitter jelly alone.  Even at one coat, it was almost opaque!  Dry time on this mani was fairly quick, and I used one coat of Peita's Polish Glitter Glaze with a coat of Seche Vite to tame those glitters.


July 6: Orange
I purchased or swapped for these myself.


If you've been reading my blog for a while, you'll either know or have noticed that I don't really wear much orange.  Oranges typically don't look great on me.  Plus, I have an aversion to it because of my having gone to the University of Georgia (and a strangely large amount of our rivals use orange!).  For this prompt, I really only had one orange that I hadn't used before, and this gave me a great excuse to wear it!  I used Essie's Bright Tights that I found dusty hunting a while ago, and I topped it with one coat of Alta Costura Vernis BrightSide.  Stupidly, I decided to try this neon without a white base coat...  As such, I couldn't get a fully opaque look at even four coats!  However, I was lucky in that the glitter topper helped to cover up some of the VNL.  Application for Bright Tights was also a bit difficult.  It dries a bit matte, so you have to work quickly to get it on the nail and keep it from dragging.  Plus, my bottle is wicked old, so it was a touch clumpy.  BrightSide applied well, but I wish there was a better glitter to base payoff since it was hard to get the larger bits of glitter out of the bottle.  I really liked that the pink and yellow glitters reminded me a bit of pink lemonade!  Both of these polishes have been discontinued, sadly, so you won't be able to find them anywhere other than blog sales (or maybe dusty hunting for the Essie).

July 7: Textured
I purchased these myself.


The last mani for tonight is a gradient I did using only textures.  I started with a base of white using Cult Tempest.  Then, I used (going from thumb to pinkie): OPI You're So Flippy Floppy, OPI Jinx, OPI I'm Brazil Nuts Over You, OPI Samba-dy Loves Purple, Sally Hansen Royal Icing, and OPI What's a Little Rain Forest?.  Sadly, Samba and Royal Icing weren't as easy to apply using the gradient method as the rest.  They just weren't pigmented enough and required an extra coat for each.  I can't really speak to proper application on any of these polishes, though, since I did the gradient instead of a normal mani.  The first photo shows the mani without a topcoat.  Next, I put on a coat of Peita's Polish Glitter Glaze, which really made the colors look richer than without the topcoat.  Lastly, I attempted a little palm tree nail art, which I copied from this awesome tutorial, using Kiss Nail Art's black striper.  (I did this on three nails but only watched the video to do it on my middle finger...  The picture got increasingly worse until the final attempt on my not-pictured pinkie looked like a weird bug...  Next time, I'll rewatch the video as I do each nail until I'm positive that I know how to do it without it looking like a second grader's abstract art.)  I topped it off with a coat of Alter Ego She Shines! topcoat.  I almost wish I could have been able to wear this for a longer period of time, but this challenge slows down for no (wo)man!

So, what did you think of this past week's manis?  Come back next Monday for next week's installment of the Summer of Untrieds Challenge!  Tomorrow we'll be taking a look at another #RedCoatTuesday!