Showing posts with label hot pink. Show all posts

Tuesday, December 30, 2014

Grey and Pink

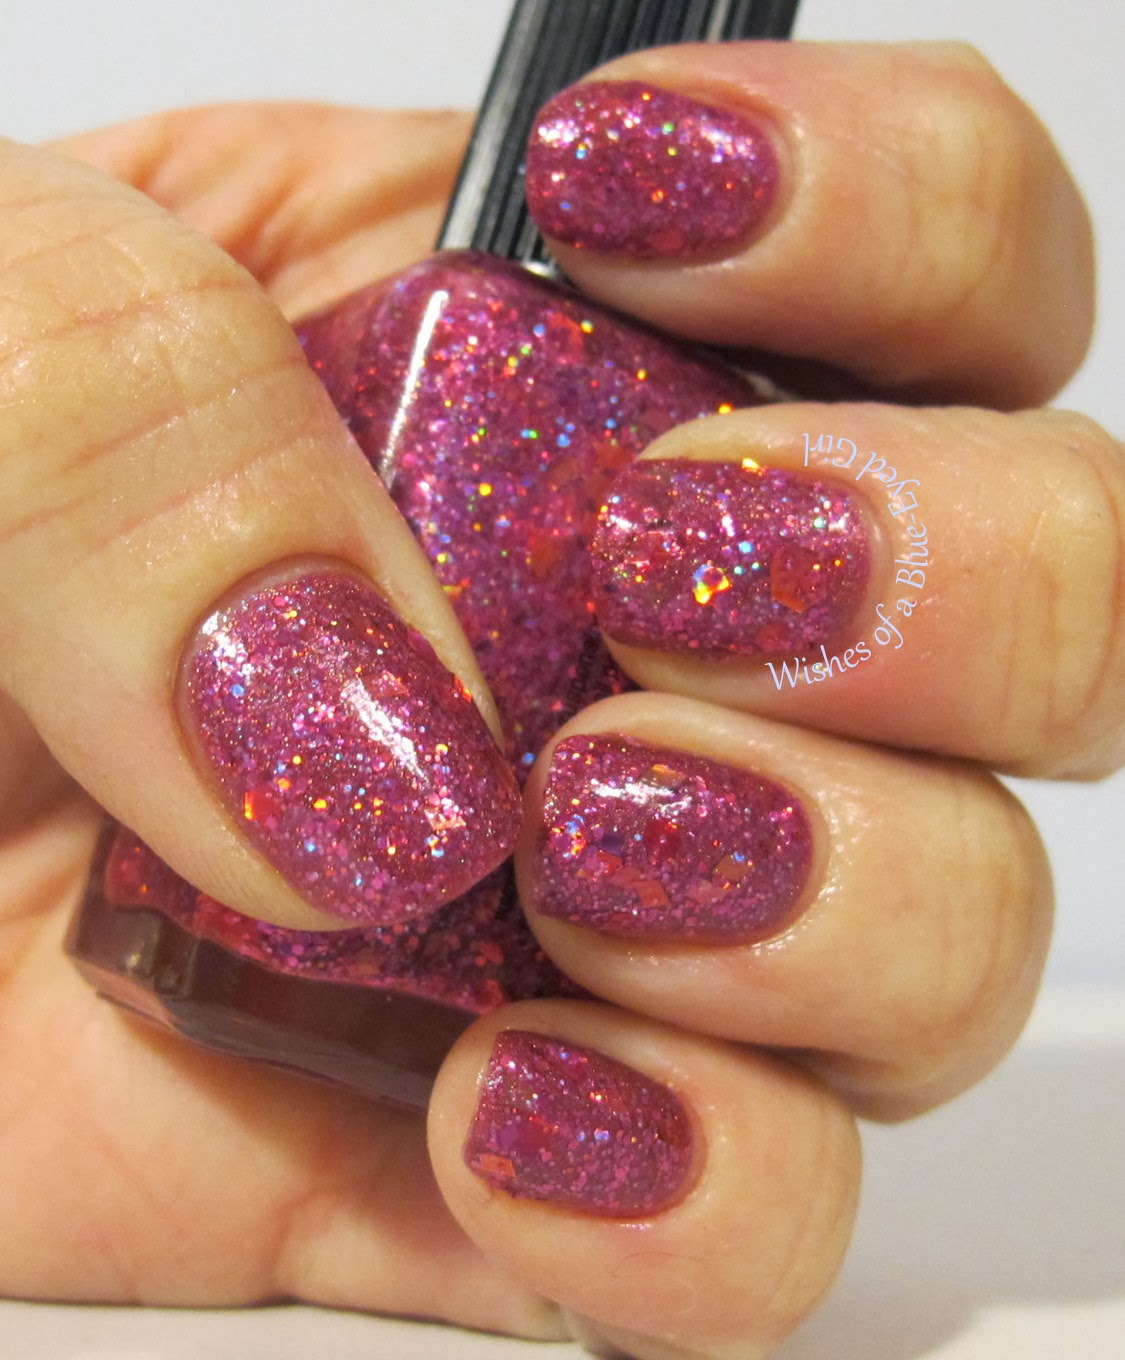
Man, I almost let the post slide tonight because I've been laid up all day with a horrible fever and cough.  But, I didn't want to give in, so here we are!  Apparently, this week is going to be an Enchanted focused week!  Tonight, we're going to take a look at a lovely grey and pink combo using Enchanted Once Upon a Cloud as accents with Lynnderella Pink Sapphire Stilettos.


Once Upon a Cloud is a lovely medium grey linear holographic with loads of pink shimmers.  This was a polish she surprise restocked, so I was very fortunate to grab it when it was listed on her shop.  Application for OUAC is pretty amazing just like with almost all of the EP's I own.  It applied easily without pooling or streaking.  You could probably wear it with just one coat, but I chose to wear it in two for my photos.


Pink Sapphire Stilettos is a pink jelly based polish packed with hot pink metallic and holographic glitters.  Even though it's a glitter, application was relatively easy, and I only needed to lightly dab to get the glitters to spread evenly.  Unlike many Lynnderella glitters, PSS is actually fully opaque on its own in two coats!  I didn't need undies, so I didn't use any this go around.  I did use an extra coat of topcoat to tame the glitters a bit and give them a glossy look.


Sadly, these two are unavailable for purchase (I'm sorry I keep doing that to you guys!), but you can find them up for sale on blog sales pretty frequently.  Otherwise, you can purchase Enchanted Polishes at her shop here and Lynnderellas at their shops here and here.

Wednesday, March 5, 2014

The Polish Bar Spring 2014 Collection

I have two gorgeous polishes from the Polish Bar's upcoming Spring 2014 collection set to be released next Monday, March 10!  I have another one to show you, but I'll save it until Friday since I have to chase the super stubborn sunlight to get the photos I want.  Tonight's set is a gorgeous combo of holographic and crelly.  Let's take a look, shall we?  Prepare yourself for some picture spam!  As always, click on the photo to see it in more detail!

These polishes were sent to me for my honest review.

Pink Rhapsody


Color:  A bright pink linear holographic with a strong purple flash.


Finish:  Holographic – pigment gives polish a rainbow in the sunshine.

Bottle / Brush:  Round mini bottle – wand and brush are just long enough to reach the bottom of the bottle.  However, the fact that it’s a mini makes application a little tricky.  Requires a steady hand to apply evenly without pooling.


Opacity:  Medium – achieves opacity at three to four coats.  Here, I used four coats for photos, but I probably could've used only three.


Glitter Application:  N/A
Consistency:  Medium – applies easily and doesn’t flood the cuticles.


Overall Ease of Application:  Easy – applies well without pooling, dragging, streaking, or balding.  Spreads evenly and smoothly.


Stampability:  Not tested for stamping.

Dry Time:  Medium – dry to the touch with minimal smudging in 3-8 minutes.


Overall Thoughts:  This has got to be one of the most unique polishes I own.  I looked in my stash to see if I had anything like it, or even anything that would work well as undies, and I came up short.  That's saying something since I own way more polishes than I care to admit!  The lovely creator says that the purple flash is only visible at "certain angles," but it was so strong at all angles and in all lights.  That flash is part of the reason why I love it so much!  Application was easy with very little cleanup required, and even that minimal cleanup was more likely due to the mini bottles that I haven't quite mastered.  The first layer goes on super sheer, but it builds up easily.  I could still see visible nail line at three coats, but my tips are quite vibrant, so that could be different on you.  Finally, Pink Rhapsody dries to a super shiny finish, much like with TBP's other holos!  I've worn it with one coat of KBShimmer Clearly on Top simply because I needed it to dry fast so I could go to bed, but a topcoat wasn't really necessary.

Spring in Bloom


Color:  White crelly featuring pink, lavender, purple, light green, and dark green dot and hex glitters.


Finish:  Glitter Crème – glitter in a crème base.

Bottle / Brush:  Round mini bottle – wand and brush are just long enough to reach the bottom of the bottle.  However, the fact that it’s a mini makes application a little tricky.  Requires a steady hand to apply evenly without pooling.


Opacity:  Medium – achieves opacity at three to four coats.

Glitter Application:  Easy – Spreads evenly without much manipulation.


Consistency:  Fluid – thin but flows easily from the brush.

Overall Ease of Application:  Medium – applies well with minimal pooling, dragging, streaking, or balding.  Spreads well without much manipulation.


Stampability:  Not designed for stamping.


Dry Time:  Medium – dry to the touch with minimal smudging in 3-8 minutes.


Overall Thoughts:  Spring in Bloom is a lovely white crelly with bright and vibrant glitters.  The first coat went on sheer with very few glitters, so I was worried that I would need do a lot of digging to get more glitter on the nail.  And when I do that, I always run the risk of flooding my cuticles by having too much polish on the brush.  However, I decided to flip the bottle upside down for a few minutes after the first coat, and the glitters came out much more readily.  [Please overlook, if you will, the fact that I should've had it flipped over already, ok?  Thanks.]  They spread easily with almost no manipulation.  While the first coat was sheer, the remaining two layers built this polish up to a gorgeous and squishy crelly.  The colors just scream spring blooms, so clearly the name was quite perfect.  Dry time was super quick as I was able to make my dinner plate within four minutes after application!  Woot woot for quick dry!  I've used one coat of KBShimmer Clearly on Top, which seems to work really well with TPB's polishes!

Like I said, the Polish Bar's Spring 2014 collection will be released on March 10 at her Etsy store!  Make sure you keep an eye out on TPB's Facebook page for the time this line will be released, which should be within the next day or two.  Also, make sure you're following them on Instagram for sneak peeks of new polishes!

These polishes were sent to me for my honest review.

Thursday, February 20, 2014

Golden Oldie Thursday Polish: Chevrons

Tonight's Golden Oldie Thursday is all about Chevrons.  Since I am nail art challenged, I decided to use some guides that I received as a Galentine's Day gift from one of my polish besties, Sara, who got them from Nail Vinyls.  I actually also purchased a few other things myself from Nail Vinyls that I'm pretty excited to try!

As always, here is the schedule of events if you would like to follow along or participate.


Remember the rules:

  • The polish you use must be at least a year old.
  • If you haven't been a polishaholic for that long, you can use the oldest polishes you have.
  • The polish should be previously used, but if you're stuck, you can use a polish from your untrieds stack.
  • You can use more than one polish as long as it fits the rules.
All polishes were purchased by me.

Tonight, I decided that I'd give nail art using soak off gels a shot.  My nails were breaking a bit, and I wanted to use the gels to help get a little better support while they grow out.  It was a pretty time intensive process that I'll describe below.


The polishes I used were all from Gelish that I purchased at Sally's at the end of 2011 and early 2012.  I used Shake it Til You Samba, You're So Sweet You're Giving me a Toothache, and Izzy Wizzy Let's Get Busy.

First, I applied one thick coat of Samba and cured it.  Next, I applied the vinyls to the freshly cured gel.  If you do your own SOGs, then you know that the color layers stay slick and tacky untl you've applied the topcoat.  That being said, it was a giant pain in the butt to get the decals to stick.  


After the decals were in place, I topped the mani off with So Sweet.  Unfortunately, because the decals wouldn't stay put, the watery gel just seeped right underneath.  I flash cured each finger for 10 seconds to keep the gel from sliding around, which helped in the spots where the decals were sufficiently affixed to my nail.  


After one coat of So Sweet, I took off the decals to assess the outcome.  As I suspected, bits of So Sweet seeped underneath and cured a bit funky.  I used a bit of acetone and my cuticle nippers to fix the edges a bit and to cut down any parts that were sticking up.


After that first coat, I decided to just free hand the remaining two coats of So Sweet and cleanup a bit as I went along.  I still flash cured it after each finger to ensure that it wouldn't slide around while I finished up my hand.


After I finished the art, I topped it all off with Izzy Wizzy and topcoat, cleaned it up, and it was ready to go!  


I wasn't that pleased with the outcome after I first finished.  For some reason, it looked weird to me.  Maybe because it reminds me of an Easter egg.  Or maybe it was because my skin was so ridiculously dry after using all of that alcohol and acetone to dehydrate and cleanse my nails.  


Either way, I decided not to do the same thing with my left hand.  Instead, I attempted a simple diagonal tape mani.  However, I had the same issue with it as I did with the chevrons.  The tape wouldn't stay down, and I had a lot of seepage underneath the tape.  I did my cleanup and went to bed.


When I woke up this morning, I was much more pleased with the outcome.  In fact, I'm actually happy with it and hope it lasts for a week or so before bubbling and lifting.  I tried a few things differently this time by using acetone instead of trying to do a dry cleanup between layers.  We'll see how that effects the wear time.

After all of that, though, I want to make perfectly clear that the Nail Vinyls work AMAZINGLY WELL on regular polish or completed SOGs.  It's just the weirdness of gels in between curing and before finishing the full mani that caused my issues.  However, my nail art noobishness really shows here because I should've used alcohol to remove the tacky layer before trying to add the decals.  That was what was recommended to me today by the super SOG expert Chickettes for the future, so I'm going to try that next time for sure.  Anyway, I really like the vinyls and cannot wait to try out more!

So, what do you think of my mani?  Do you do your own SOGs? 


Tuesday, January 7, 2014

The Opposite of a Palate Cleanser

So far, 7 days into the new year, I've definitely been doing well on one of my resolutions.  Arguably, it's the most important resolution, too, you know, the one to stay positive?  I'm really proud of myself!  The other resolutions are still very much a work in progress, but at least they're in progress and not just over.  Did you set goals for the new year?  How are you fairing?

Tonight's post is a bit of a blast from the past as I took these photos last summer when my nails were long but my skin was wicked dry.  Do your best, if you can, to ignore the dry skin.  Aaaaand ignore the old lighting setup that pulls a little more yellow than my current setup.  Ok, now that we've got all of these things out in the open, let's take a look at the juicy gloriousness that is Girly Bits Jelly Shoes!


*I was not financially compensated for this post.  All items in this review were purchased by me for my own use.  The opinions are completely my own based on my experience.  For more information, please see my Disclosure Policy in the tab above.*


Color: Hot pink with a blue flash.
Finish: Jelly – a squishy and translucent finish that reminds me of jelly shoes...  That's my normal description of jellies, and it's so apropos for this polish!
Bottle / Brush: Round bottle – the brush and wand are the standard width and length.  Easy to control and manipulate.
Opacity: Low – it requires several coats for opacity, but you'll never really get rid of visible nail line.  Here, I've used three coats, and you can still see VNL.


Glitter Application: N/A
Consistency: Medium – applies easily and doesn’t flood the cuticles.  Looks streaky at first, but builds up nicely.


Overall Ease of Application: Medium – applies well with minimal pooling, dragging, streaking, or balding.  Spreads well without much manipulation.
Stampability: Not designed for stamping.
Dry Time: Medium – dry to the touch with minimal smudging in 3-8 minutes.


Overall Thoughts: This is my go-to hot pink.  I don't care if it's a jelly.  Hell, it's especially my go-to for jelly sandwiches!  You can find it all over the blog, but this is the first time I've had a review of Jelly Shoes on its own.  As you can see, in three coats, it still shows visible nail lines, but if you're looking for a good jelly, you really can't beat this perfect Girly Bits.  It applies smoothly, dries quickly, builds up nicely, and works amazingly for jelly sandwiches.  The Girly Bits site is down right now, so I can't tell you if this or any of the other Slapdash Collection from last summer are still available, but I hope they are!  This is probably my favorite full indie collection ever.  I purchased the whole set when they came out, and I've used them a ton.  They are so versatile and pretty with unique flashes and shimmer combinations.  Perfect for summer or for when you need a pop of bright color during the dreary cold.

You can purchase Girly Bits at her storeLlaroweOverall Beauty, Harlow and Co., and Mei Mei's Signatures.  Follow the lovely Pam on FacebookTwitter, and Instagram for news and updates on additions to her line of gorgeous polishes.

*I was not financially compensated for this post.  All items in this review were purchased by me for my own use.  The opinions are completely my own based on my experience.  For more information, please see my Disclosure Policy in the tab above.*

Monday, December 16, 2013

Hot pink!

So, I know it's the middle of winter and everyone is doing holiday colors, but I was in the mood to show you guys a gorgeous hot pink.  Let's take a look at my first Limited Edition Lynnderella that I purchased myself instead of receiving it as a gift: Don't Drink this Pink.

*I was not financially compensated for this post.  All items in this review were purchased by me for my own use.  The opinions are completely my own based on my experience.  For more information, please see my Disclosure Policy in the tab above.*


Color: Hot pink glitter jelly with hot pink holographic glitters.
Finish: Glitter Jelly – glitter in a colored jelly base.


Bottle / Brush:  Rectangle bottle – ribbed cap that is a little hard on the hands to open if you have sensitive skin.  The wand is the standard length, but the brush is a little too thin to pick up large / shaped glitter without fishing.  The brush's width is also an issue for spreading.  It doesn't fan out and pretty much requires you to dab polishes that are densely packed with glitter.


Opacity:  Medium – achieves opacity at three coats, but here I've worn one coat over OPI DS Signature which is a bright pink linear holographic.
Glitter Application: Medium – requires the dab method, but glitters are easy to extract and spread evenly.


Consistency: Thick – thick or it can be clumpy, but is easily remedied with some polish thinner.
Overall Ease of Application: Medium – applies well with minimal pooling, dragging, streaking, or balding.  Spreads well with the dab method.


Stampability: Not designed for stamping.
Dry Time: Quick – dry to the touch without smudging in under 3 minutes.


Overall Thoughts: Holy crap you guys.  This polish is just so INSANELY packed full of hot pink glitters that it just gobbed on super easily, but it's definitely one of those polishes that requires the dab method.  I was able to get the larger glitters out easily despite the brush being thin.  I did leave it upside down for a while before applying.  It's a perfect pairing with DS Signature, too.  The base color and the color of the glitters are exactly the same shade of vibrant pink.  The only thing that makes me sad about this mani is the fact that you can't really see the in your face holo of Signature.  This polish is a MASSIVE topcoat eater, so make sure you either use a generous coat of Gelous, Glitter Food, or Glitter Tamer before putting on your topcoat.  


Sadly, this LE has been discontinued, but you may occasionally find one on a blog sale.  If you do, you need to snap it up as quickly as possible.  It's just.  that.  good.  Seriously.  I purchased my OPI DS Signature on a dusty hunt from a local salon that was a treasure trove of amazing old polishes.  You can purchase Lynnderellas at their store here.  Follow their fan-run FacebookTwitter, and IG pages.

*I was not financially compensated for this post.  All items in this review were purchased by me for my own use.  The opinions are completely my own based on my experience.  For more information, please see my Disclosure Policy in the tab above.*

Tuesday, October 29, 2013

Oldie but Goodie: OPI Liquid Sand The Impossible

Ok, I'm going to be dredging up a lot of photos that I took a loooooong time ago for the next month since I won't be painting my nails as often.  Some of these are from back before I moved in May, so there will be a different lighting scheme going on.  And of course, my nails were much longer and healthier back then for sure!  Either way, I hope that you don't mind the older photos, which also means older polishes, as I work through my No Polish November.  More details on that and a giveaway for those participating in the challenge will be up later this week.  Also, don't forget to get your donations for I Need a Lighthouse for my Depression Awareness Giveaway by 10/31!  Check out the info on what do do here, here, and here for instructions on how to pay with PayPal if you'd rather do that.  Ok, let's get into some polish, shall we?!

Tonight, let's take a look at OPI Liquid Sand The Impossible.  I have the mini bottle, which has a few distinct differences from the larger bottle.  Let's take a look!  Photos are with and without topcoat in indoor lighting.

*I was not financially compensated for this post.  All items in this review were purchased by me for my own use.  The opinions are completely my own based on my experience.  For more information, please see my Disclosure Policy in the tab above.*


 Color: Bright hot pink with small and medium hot pink hexes.  Leans more red/orange when topcoated.


Finish: Textured – a polish designed to be worn without a topcoat and to have a rough finish once dry.  Finish is gritty and almost sand-like.


Bottle / Brush: OPI Mini bottle – designed as a miniature version of the larger bottles.  The shorter handle and wand make it hard to handle.  The brush is also not as wide as the new pro-brush.


Opacity: Medium – achieves opacity at three coats.  First coat is streaky, but builds well with subsequent coat.  Here, I've done three coats to ensure full coverage for photos.
Glitter Application: Easy – Spreads evenly without much manipulation.


Consistency: Medium – applies easily and doesn’t flood the cuticles.
Overall Ease of Application: Medium – applies well with minimal pooling, dragging, streaking, or balding.  Spreads well without much manipulation.


Stampability: Not tested for stamping.


Dry Time: Long – dry to the touch with minimal smudging in over 8 minutes.  This is my only problem with this polish.  It takes FOREVER to dry.  I think part of that is due to the fact that I'm used to instant gratification with quick dry topcoats, and Liquid Sands are typically worn without a topcoat.  It's not a deal breaker, but it wasn't awesome when I dinged it pretty badly 15 minutes after painting.


Overall Thoughts:  The first thing you'll notice is that the mini bottle's brush is a lot thinner than the standard bottle's wide brush.  Couple the thin brush with the smaller handle, and you get a bottle that's relatively more difficult to handle.  While that was irritating for sure, it didn't completely kill my opinion of this polish.  The second thing you'll notice is that the mini bottles don't contain the cute stars that are in the full sized bottle.  Now that made me sad.  When I started seeing swatches with the stars in it, my heart sank.  I totally would've gotten the big bottle if I had known it had stars that weren't present in my mini!  Ahh well.  C'est la vie!  Otherwise, I really enjoyed this polish.  Dry time was a huge miss for me, but the fact that it's textured means that you couldn't tell that I dinged pretty badly on my ring finger since I was able to manipulate the polish to cover the ding.  Boooyah!  I also really enjoyed this polish with a topcoat.  Tomorrow, I'll show you what it looks like with a glitter topper.  Hint hint: it's hot.

This polish came out last year, but you should still be able to find these where OPIs are sold.

*I was not financially compensated for this post.  All items in this review were purchased by me for my own use.  The opinions are completely my own based on my experience.  For more information, please see my Disclosure Policy in the tab above.*

Tuesday, June 18, 2013

ECOPOLO Summer Mani Challenge: Summer Floral

See?  I told you I'd be quicker about getting this week's challenge mani up!  Here's the weekly breakdown:


Well, these didn't turn out as nice as I was hoping.  Don't you hate it when you get an idea in your head but you simply just cannot execute it?  I was attempting to do hibiscus flowers using this tutorial from thatleanne. But yeah, it totally didn't work out.  At all.  I don't know how many times I redid this stupid mani, but I finally decided that what I came up with would just have to do.


I did a mini skittle mani on my thumb, index, and pinkie nails using China Glaze Hawaiian Punch, Zoya Yana, and Zoya Myrta.  Then, I painted two accent nails with Cult Nails Tempest and added my dotted on flowers using Hawaiian Punch and Yana. I used Zoya Myrta to create the pistil, but, as you can see, they were way too thick.


I'm sure I'll eventually get to a review of the three polishes I haven't reviewed yet, but I'll give a quick and dirty blurb about each polish just in case you're curious.


Hawaiian Punch is a gorgeous vibrant red with flashes of pink making it lean more towards a hot pink.  Application was easy, no clumping, pooling, streaking, or dragging.  I used three coats.


Yana is a gorgeous corally pink that actually WORKED on me!  I don't typically do well with Zoya cremes. They either streak like mad or refuse to dry, but Yana was perfect.  Application was super simple and required almost no cleanup.  This is three coats.


Tempest is a gorgeous white that achieves opacity in one thick coat or two coats if you're striving to keep bubbles and shrinkage to a minimum.  Application is a little more tricky than the other two.  If you want opacity with one coat, you have to do three quick swipes without going over parts that have already been painted, otherwise you'll get bald spots.  This is one thick coat and one thin coat.


You can read my review of Myrta here.  It's the old format, but I think you get the idea.  I used two coats because I nicked it a little and wanted to make sure I covered that bit up.


Lastly, I tried out a new quick dry topcoat last night, and it left me with mixed feelings...  Nubar Diamont isn't as thick as Seche Vite or HKGirl, and it doesn't have the same strong smell, either.  It dries super fast and really hard like SV but without the shrinkage and bubbles SV is known for, which is what I've been looking for.  However, it didn't dry shiny.  Take a look up there at my macros of Hawaiian Punch and Yana.  Go ahead.  I'll wait.  Yeah, those would be brush strokes.  Ugh.  I'm not sure if it's just that Diamont doesn't play well with Zoya and China Glaze, or if maybe I allowed the brush to touch the paint, which was mostly dry at that point, and it mixed the paint with the topper?  I'm not sure.  It also smeared the art a little even though I waited  a good 10-15 minutes after painting them to add the topcoat.  So yeah, I'm still going to experiment with Diamont, but I'm a little disappointed with the outcome as of right now.  I received this little baby from a friend who has a huge refill bottle.  I've always wanted to try it out, but I didn't want to commit to a full size bottle in case I hated it.

You can purchase Zoyas at salons or beauty supply shops like Ulta.  You can purchase Cult Nails at their online store here.


What's your favorite summer flower?