Showing posts with label jelly sandwich. Show all posts

Monday, August 11, 2014

Rainbow Honey 20% Cooler

It's been a loooooong time since I took these photos, but they sort of go with last week's blue creme comparison since I actually just put it over those five polishes.  So, because it's been a long time since I did this mani, and my brain doesn't remember things very well anymore, this will be a predominantly picture heavy post.  Enjoy Madame Righty as she shows you 20% Cooler!

[I purchased all polishes myself.]


Just as a memory refresher, my undies are (from thumb to pinkie): Deborah Lippman Let's Hear it For the Boy, Elevation Alphubel, OPI What's with the Cattitude, BarryM Blueberry Ice Cream, and China Glaze Electric Beat.  I really liked the look of this glitter on top of the blues.  It reminded me of a rainbow in a clear blue sky.


20% Cooler is a clear based polish with a rainbow of glitters ranging from matte to metallic in varying sizes.


I did one coat of 20% Cooler over the blue ombre.  Application wasn't too bad, but it was definitely thick like most of my Rainbow Honeys.  So, you may need to get some thinner.


I really like how bright and happy this looks.  In the bottle, it looks like the base has a bit of a grey tinge, but it's actually clear with some micro glitters that muddy the base in the bottle.  It doesn't come across as grey or muddy on the nail, though.


I love the look of glitters matted, so I'm not sure why I don't do it more often.  Here, I've topped my mani with NYC's matte topcoat.


And then, just because I wanted to show how versatile this little guy can be, I used OPI Don't Touch My Tutu, my go-to white jelly, to do a jelly sandwich!


You can purchase Rainbow Honey polishes at their store.  Follow them on Facebook, Instagram, and Twitter for news and updates.

So, what do you think?  Do you like rainbow glitters?  Which is your favorite rainbow glitter?

[I purchased all polishes myself.]

Thursday, March 13, 2014

Golden Oldies Thursday: Purple

Yeah, I know.  I know.  I didn't do last week's GOT Polish post...  I did do the mani, though, so I'll just have to put the post up super late.  Last week was a super busy week with the restock as well as deadlines at work, but I'm back on track again!  So, tonight's polishes are both a lovely shade of light purple.  Shall we?

Here is the GOT Polish schedule of events if you would like to follow along or participate.


Remember the rules:

  • The polish you use must be at least a year old.
  • If you haven't been a polishaholic for that long, you can use the oldest polishes you have.
  • The polish should be previously used, but if you're stuck, you can use a polish from your untrieds stack.
  • You can use more than one polish as long as it fits the rules.
I purchased all polishes in this review.


OPI Care to Danse
Color:  Super pale lilac that leans pink a bit. 
Finish:  Jelly – a squishy and translucent finish that reminds me of jelly shoes.
Bottle / Brush:  OPI Mini bottle – designed as a miniature version of the larger bottles.  The shorter handle and wand make it hard to handle.  The brush is also not as wide as the new pro-brush.


Opacity:  Low – it requires several coats for opacity, but you'll never really get rid of visible nail line.  Here, I used two coats as a base, one coat of glitter, one coat of jelly, another coat of glitter, and a last coat of jelly.
Glitter Application:  N/A
Consistency:  Medium – applies easily and doesn’t flood the cuticles.
Overall Ease of Application:  Easy – applies well without pooling, dragging, streaking, or balding.  Spreads evenly and smoothly.


Stampability:  Not designed for stamping.  Although, I definitely want to try a pond mani with this guy.
Dry Time:  Medium – dry to the touch with minimal smudging in 3-8 minutes. 
Overall Thoughts:  This is a true jelly.  I'm not sure it will ever really build up to full opacity, but it makes a perfect polish for jelly sandwiches.  Application was easy once I got enough polish on the brush, but those OPI mini bottles are such a massive pain in the butt.  Other than that, Care to Danse went on the nail easily and required almost no cleanup.  The layers dried quickly, which made it easier for me to move fast to get this mani done.  I'm almost sad I only have a mini, now, because this is a pretty great polish.  Sadly, the NY Ballet collection has been discontinued, but you can often still find some in beauty supply stores or salons.


Lynnderella Crocus Pocus
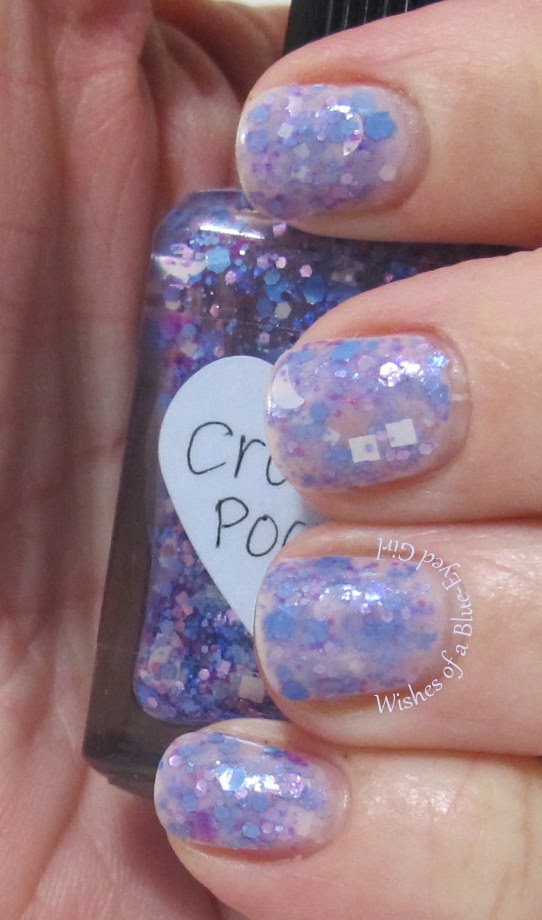
Color:  Clear base with purple, blue, magenta, white, and iridescent glitters in hexes, squares, moons, and stars.
Finish:  Glitter Top Coat – glitter in a clear base to be worn as a top coat.


Bottle / Brush:  Rectangle bottle – ribbed cap that is a little hard on the hands to open if you have sensitive skin.  The wand is the standard length, but the brush is a little too thin to pick up large / shaped glitter without fishing.  The brush's width is also an issue for spreading.  It doesn't fan out and pretty much requires you to dab polishes that are densely packed with glitter.
Opacity:  Glitter topcoat – not designed for full opacity.
Glitter Application:  Easy – Spreads evenly without much manipulation.


Consistency:  Fluid – thin but flows easily from the brush.  This isn't like the normal Lynn glitter bomb that tends to clump up on the brush when you apply it.  Instead, it's a glitter topper that requires building instead of dabbing.
Overall Ease of Application:  Easy – applies well without pooling, dragging, streaking, or balding.  Spreads evenly and smoothly.
Stampability:  Not designed for stamping.


Dry Time:  Medium – dry to the touch with minimal smudging in 3-8 minutes. 
Overall Thoughts:  Like I mentioned earlier, this isn't a normal Lynnderella glitter bomb, which is refreshing!  The glitters came out with ease, but I did have to dig a little for the shaped glitter - not too much, but just a little.  This is two coats between coats of Care to Danse, which built up nicely.  It spread easily over the nail without any need to dab, and it didn't bald or pool at all.  It's simply a nice and pretty glitter topcoat!  You can purchase Lynnderellas at their store here.  Follow their fan sites on Facebook and Instagram for news and updates!

I purchased all polishes in this review.


Tuesday, January 1, 2013

Happy New Year!

Happy new year, everyone!!!  I hope everyone had a nice and safe time celebrating the new year last night.  I spent my night passed out on the couch.  I'd like to say it was from alcohol, but it was actually from being sick...  I'm still running a low grade fever, but I really wanted to get a post up today since I've been slacking so much lately.  Today, I'm going to show you part 2 of my Kelara swatches: Daydream, Dragon Scales, and Mother Earth.  I'll have my final Kelara for you guys tomorrow.  Get ready, this post is going to be very picture heavy!

When I received my Kelara Lacquers, they came packaged in these cute little organza bags.  I really liked the presentation.  It was like opening up a party favor.


Daydream


Color: White with blue, teal, and pink glitters and a micro iridescent shimmer.
Finish: Glitter Jelly – glitter in a colored jelly base.
Bottle / Brush: TKB hexagon brush – lid is tapered at the bottom and larger at the top, which helps with handling the brush and application.  The wand is an average length.  The brush is thin but long, so you have to make sure you don’t load up on polish on your brush otherwise it may pool up on your cuticles.
Opacity: Medium – achieves opacity at three to four coats.
Glitter Application: 
Easy – Spreads evenly without much manipulation.
Consistency: Thick – thick but is easily remedied with some polish thinner.
Overall Ease of Application: Medium – applies well with minimal pooling, dragging, streaking, or balding.  Spreads well without much manipulation.
Stampability: Not designed for stamping.
Dry Time: Medium – dry to the touch with minimal smudging in 3-8 minutes.
Overall Thoughts: Like with Saturn, I had to add a little bit of thinner to this guy to make it easier to spread.  Once I did, though, it applied very easily.  The glitters came out easily and spread well.  It's almost too glittery for my taste.  I did three coats on all fingers but my ring finger, which I did a jelly sandwich with OPI Don't Touch My Tutu.  I'm definitely going to jelly sandwich it or wear it with unders next time.  It's a pretty and delicate polish that will be perfect for springtime.


Dragon Scales


Color: Green with gold micro glitters.

Finish: Shimmer – a polish that shimmers in the light from micro glitters.
Bottle / Brush: TKB hexagon brush – lid is tapered at the bottom and larger at the top, which helps with handling the brush and application.  The wand is an average length.  The brush is thin but long, so you have to make sure you don’t load up on polish on your brush otherwise it may pool up on your cuticles.
Opacity: High – opaque at one coat!  I used two coats for the photos.
Glitter Application: N/A
Consistency: Thick – thick but is easily remedied with some polish thinner.
Overall Ease of Application: Medium – applies well with minimal pooling, dragging, streaking, or balding.  Spreads well without much manipulation.
Stampability: Not tested for stamping.
Dry Time: Quick – dry to the touch without smudging in under 3 minutes.
Overall Thoughts: Wow.  I was blown away by this polish.  As you can see from the macro shot, not only does this polish have gold flecks, it also has micro green holo particles that make this polish sparkle.  Again, I added a little thinner, but it applied easily once added.  The gold in Dragon Scales seriously makes this green glow.  It's definitely one of my top greens.


Mother Earth


Color: Gold glitters in three sizes in a clear base.
Finish: Glitter Top Coat – glitter in a clear base to be worn as a top coat or in a jelly sandwich.
Bottle / Brush: TKB hexagon brush – lid is tapered at the bottom and larger at the top, which helps with handling the brush and application.  The wand is an average length.  The brush is thin but long, so you have to make sure you don’t load up on polish on your brush otherwise it may pool up on your cuticles.
Opacity: Glitter topcoat – not designed for full opacity.
Glitter Application: Medium – requires the dab method, but spreads evenly.
Consistency: Thick – thick but is easily remedied with some polish thinner.
Overall Ease of Application: Medium – applies well with minimal pooling, dragging, streaking, or balding.  Spreads well without much manipulation.
Stampability: Not designed for stamping.
Dry Time: Medium – dry to the touch with minimal smudging in 3-8 minutes.
Overall Thoughts: Mother Earth is so packed full of glitter, that you definitely need to add quite a bit of thinner to get it to a more easily flowing consistency.  At least, for me, I like for my glitters to spread a little more sparsely rather than being total glitter bomb.  Once I added thinner, the glitters spread evenly without much work.  If I left the consistency the same as when I received it, I would definitely have to use the dab method.  I swatched it over Saturn, and they looked great together.  Like most glitters, removal was a bit difficult.  I recommend using the glue basecoat method or the foil method.  I don't own much gold, so I'm glad to have this beauty in my stash.  It's like wearing jewels on my fingers.

You can purchase Kelara Lacquers at their Etsy store.  Follow them on Facebook for news on updates and new colors.

Which of the Kelara Lacquers that I've shown you so far is your favorite?

*I was not financially compensated for this post. I received a sample for review purposes. The opinions are completely my own based on my experience.* 

Monday, December 24, 2012

Merry Christmas Eve!!

Today is my family's day to celebrate Christmas, so we're spending time watching movies, opening gifts, and eating tasty foods.  I'm taking a break from gluten free eating today, so I can partake in some tasty cheese cake and amazing (aged) beer.  Our holiday traditions are a bit crazy.  First, we have "Little Santa Claus" who comes to fill our stockings on Christmas Eve Eve.  We get together early Christmas Eve morning and tear into our stockings.  Then, we open one gift every hour until we run out of time and have to open them more frequently.  The person who screams "Christmas Eve Gift" first to every member of the family gets to open the first gift and choose which one it will be.  We eat tasty food that's usually homemade finger foods and then a super tasty steak dinner.  We watch movies that are either our Christmas favorites, like National Lampoon's Christmas Vacation, or we'll watch movies that we received as gifts.  We'll play board games.  We just spend the day having a great time with one another.  Then, Santa Claus comes Christmas Eve night.  We wake up early and check out what Santa has brought us.  Even though we're all adults, Santa still comes to visit.  It's truly special to be able to spend such quality time with my family.  We're a very tight knit crew, so it's one of my favorite times of year!

I'm going to attempt to do something a little different starting from today.  I'm going to try to tweak my reviews a bit so you can get the best bang for your buck.  Usually, I just give it a brief overview, but since I show so many indies, I want you to know exactly what you're getting into with these before you commit.  If you don't like the way I set this up, PLEASE let me know.  I don't mind and welcome constructive criticism.  Also, if there's something you ever want me to add in to my reviews, just leave it in the comments, and I'll endeavor to add it to my little template.

In honor of Christmas, today, I'm going to show you my candy cane manicure. I have three polishes to show you today, so we'll briefly talk about each one in turn.  

OPI Don't Touch my Tutu, Dollish I Can't Put My Arms Down, Dollish 1-Up 

OPI Don't Touch My Tutu

(I'm missing a shot of this one, sorry!!)

Color: White
Finish: Jelly - a squishy and translucent finish that reminds me of jelly shoes.
Bottle / Brush: OPI bottle with the new wide brush - if you have small nail beds, this brush may be too large for you.  The wide brush tends to cause the polish to flood your cuticles, so you have to be very careful when applying.  Don't get too much polish on the brush when you're ready to apply it to the nail.  The brush length and cap are both the standard that OPI uses, and has a pretty average application.
Opacity: Low - it requires several coats for opacity, but you'll never really get rid of visible nail line.
Glitter: N/A

Overall Ease of Application: Medium – applies well with minimal pooling, dragging, or balding.  Spreads well without much manipulation.
Stampability: Not designed for stamping.
Dry Time: Medium – dry to the touch with minimal smudging in 3-8 minutes.
Overall Thoughts: It's the perfect white jelly for me.  It isn't streaky like Essie Marshmallow.  It's bright enough that you can tell it's white, but it's also transparent enough that you can still see through it if you decide to use it in a jelly sandwich.

Dollish Polish 1-Up


Color: Green and white
Finish: Glitter Top Coat – glitter in a clear base to be worn as a top coat.
Bottle / Brush: Tall skinny round bottle brush – long cap with standard size wand.  Some of these brushes come bent.  Average application with standard non-bent brush.  Picks up glitter decently, but it isn't the best.
Opacity: Glitter topcoat – not designed for full opacity.
Glitter Application: Hard – difficult to dig the glitters out of the bottle, spreads well with the dab method, but pools at the cuticles and bubbles when dry.
Overall Ease of Application: Difficult – applies with some pooling, dragging, streaking, or balding.  Spreads well with manipulation.
Stampability: N/A
Dry Time: Long – dry to the touch with minimal smudging in over 8 minutes.
Overall Thoughts: 1-Up is a unique polish, but it's a bit of a pain to apply.  To get the amount of glitter I wanted, it required quite a bit of polish.  I wanted to only apply one coat, but it pooled on the sides making the polish uneven.  I would've done better had I applied two thin coats instead.  Further, it took a very long time to dry.  It worked alright in a jelly sandwich, but I'm still not a huge fan.  This is definitely one that will end up on my blog sale at the end of the month.

Dollish Polish I Can't Put My Arms Down


Color: Red
Finish: Shimmer – shimmers in the light from micro glitters.
Brush: Round bottle with average brush – standard width and length.  Easy to control and manipulate.
Opacity: Medium – achieves opacity at three to four coats.
Glitter Application: Easy – Spreads evenly without much manipulation.
Overall Ease of Application: Medium – applies well with minimal pooling, dragging, streaking, or balding.  Spreads well without much manipulation.
Stampability: Not designed for stamping.
Dry Time: Medium – dry to the touch with minimal smudging in 3-8 minutes.
Overall Thoughts: It's a beautiful orange-y red with gorgeous micro shimmer.  It applies really well, but it's not very unique.  It didn't stain when I removed it like so many reds, so that's definitely one thing going in it's favor.  While it's a very pretty color, I'll probably sell it simply because I have way too many polishes, especially too many reds.

For my candy cane mani, I did a jelly sandwich with Don't Touch my Tutu and 1-Up.  Then, I striped on I Can't Put My Arms Down with my thin art brush.  I topped it with two coats of Seche Vite.


You can purchase Dollish at her store (which is down for maintenance right now), Llarowe, and Overall Beauty.  You can purchase OPI where OPI's are sold (salons and supply stores like Ulta).  Unfortunately, all of these polishes are limited editions, so they're a bit harder to find.

What's your favorite Christmas / Hanukkah / Festivus / Kwanzaa / Long Weekend in December tradition?

Wednesday, September 12, 2012

Jelly Sandwich: KBShimmer Elle

You guys asked for it, so I'm delivering - a jelly sandwich!  KBShimmer's Elle and OPI My Pointe Exactly.


OPI My Pointe Exactly is a grey jelly that is from OPI's NY Ballet collection that came out this summer.  KBShimmer's Elle is a grey jelly based polish with large pink hexes, large grey hexes, medium matte pink hexes, white squares, white hexes, and silver holo hexes.  It layers up nicely on its own, but I really wanted to try out a jelly sandwich with these two.  They complimented each other perfectly!

The best way I can describe to do a jelly sandwich is to put down one coat of your jelly base coat, top it with a coat of your glitter, and alternate until you get the look you're after.  Here, I did a coat of My Pointe Exactly, a coat of Elle, another coat of My Pointe Exactly, one more of Elle, and finally finished it off with a last coat of My Pointe Exactly.

Isn't it pretty???

Check out this closeup shot.  It looks like the glitters are just floating in space.  It's so cool!!


My Pointe Exactly is a typical jelly.  By itself, it has very light coverage with lots of visible nail line.  If you're ok with VNL, then it would be a gorgeous light grey for you.  I, however, don't really fancy VNL.  In fact, it kinda drives me crazy, which is why doing a jelly sandwich was a perfect use for My Pointe Exactly.  Unfortunately, My Pointe Exactly has been discontinued, but I saw a few at my local Kroger.  I'm sure you can also still find some at Ulta.  

KBShimmer Elle spread easily without streaking or much manipulation on my part.  It really is a great polish.  I only have 2 KBShimmers, but so far I really like them!  I received my bottle in a swap, but you can purchase them from Christy at her store here.  You can also follow her on Facebook and Twitter for news and updates.

What's your favorite jelly sandwich combination?

Tuesday, August 28, 2012

Jelly Shoes jelly sammich!

I have a quick post for you guys today: a sort of jelly sandwich.  By definition, yes, this is a jelly sandwich, however, it doesn't really look like one on the nail.  I have other jelly sandwich ideas, but I really wanted to try out the combination of Girly Bits Jelly Shoes and Hare the Sky was Pink first.


So, for my first blog jelly sandwich I am wearing 1 coat Girly Bits Jelly Shoes + 1 coat Hare The Sky was Pink + 2 more coats of Jelly Shoes.

Sorry, you guys get my janky right hand since I had a major nail catastrophe on my left pinky.

Jelly Shoes is a bright neon pink jelly with glass flecks and flashes of blue shimmer.  It applied beautifully.  As a jelly finish polish, it definitely needed several coats for full coverage. It worked perfectly with Hare the Sky was Pink as it's just a bit brighter than the base color of the Hare, so it brightened the mani up quite a bit.  I was in a super rush to get my nails done last night, so I got polish all over my cuticles.  Luckily, Jelly Shoes didn't stain or hang onto my cuticles once I cleaned up with acetone.  But seriously, guys, look at that gorgeous blue shimmer!

It makes this mani glow!

The Sky was Pink is a pink based polish with blue/purple/blurple fine hex and square glitters.  The glitters scatter out well giving a granite illusion.  All day today, I kept looking at this polish, and I am seriously in love!  It applied well, which means it wasn't too thick like some glitter bombs.  It spread easily without much manipulation on my part.  The only problem I had with this particular polish is when the glitters got on my skin, they were almost IMPOSSIBLE to get off.


A close-up to see a better view of the jelly sandwich.

Verdict: I think I'll keep them both!  It's hard to hate anything paired with Jelly Shoes.  Just sayin'.


What's your favorite jelly sandwich combination?