Showing posts with label nail polish. Show all posts

Friday, December 6, 2013

Happy St. Nicholas Day!

I had so many plans to do sooooo many things on the blog this week, but last weekend's orders have consumed pretty much all of my down time, which is why I'm writing this while at work...  Shhhh, don't tell.  And no, I'm not billing.  ;)  I wanted to take a moment to wish everyone who celebrates a Happy St. Nicholas Day!  A good friend of mine, Sara (from Born For a Storm), asked me to make a special polish to celebrate St. Nicholas Day, so that's what I did!  Yes, this is the same Sara who is also the inspiration behind the Once More with Feeling Collection.  ;)  Let's take a look at it below!


Here's a little information about St. Nicholas Day from the St. Nicholas Center

"In many places, St.  Nicholas is the main gift giver.  His feast day, St. Nicholas Day, is December 6, which falls early in the Advent season.  Some places he arrives in the middle of November and moves about the countryside, visiting schools and homes to find out if children have been good.  Other places he comes in the night and finds carrots and hay for his horse or donkey along with children's wish lists.  Small treats are left in shoes or stockings so the children will know he has come.


Where St. Nicholas is prominent, his day, not Christmas, is the primary gift giving day.  Parties may be held on the eve, December 5th, and shoes or stockings left for St. Nicholas to fill during the night.  Children will find treats of small gifts, fruits or nuts, and special Nicholas candies and cookies.  St. Nicholas gifts are meant to be shared, not hoarded for oneself."


For more information about how countries around the world celebrate St. Nicholas Day, check out the Around the World page from the St. Nicholas Center - Discovering the Truth about Santa Claus.


So, there's my inspiration for St. Nick's Sweet Treats, the next polish in the Holiday Limited Edition collection! Each bottle will be numbered, and only 10 will go up for sale.  A few others will be made for giveaways and gifts, but the majority of them will be up for sale tonight at 9:00 pm est.  


St. Nick's Sweet Treats is a clear based polish with silver micro-flakies, glitters predominantly in gold, red, and white, with extra bits of color splashed in.  The red and white represent St. Nicholas while the gold represents the coins he would leave behind.  The white rectangles, red hearts, and other smaller multi-colored glitters represent gifts and sweets he would leave in children's shoes.  Lastly, the white moon celebrates the fact that he comes over night to leave fun surprises for children who have been good.


This is a glitter bomb to the max.  It definitely required the dab method and some extra topcoat to smooth it down.  Here, I've used one heavy coat on top of KBShimmer's Every Nook and Cranberry with a coat of Lynnderella Glitter Tamer and a coat of KBShimmer Clearly on Top.


Dry time was pretty quick, but I attribute that to wearing a matte polish as undies.  The shaped glitters can be a little difficult to get out of the bottle, so I suggest flipping it upside down for a bit before you use it.


Above, I've worn it over a bright red, but I think it looks better over darker colors.  Check out this gorgeous swatch by Amy from atlcatsmeow.  She's used St. Nick's Sweet Treats over OCC Isherwood.


St. Nick's Sweet Treats will be out tonight at my store here at 9 pm est.  I promise I won't be late this time!!!  :)  Grab one while you can!  Happy St. Nicholas Day!!  Also, stay tuned this weekend for a LONG overdue giveaway announcement...  I promise, though, it'll be worth the wait!

Thursday, November 28, 2013

Happy Thanksgiving and Happy Hanukkah!

I'm currently spending time with my family, but I wanted to show you my Thanksgiving and Hanukkah manis!  I'm not Jewish and don't celebrate Hanukkah, but I wanted to do a mani to say Happy Hanukkah to all who celebrate it!  Get ready for a crap ton of pictures!

First, for my Thanksgiving mani, I did a jelly sandwich using one of Lynnderella's Thanksgiving Twinset polishes Punkkin Pie in between layers of Colors by Llarowe Coconut.  Then, I attempted a pond mani using stamps from Red Angel plate 121 sandwiched in CbL Coconut and Elevation Polish Cascade.  For stamping, I used Essie Good as Gold, Essie Penny Talk, and China Glaze Passion.


The idea in my head was lacking in execution.  Coconut is technically a jelly, but it's a bit too opaque for jelly sandwiches and pond manis, unless you're using super beyond sheer layers, which I even attempted to do. Cascade was a perfect polish to work with as it wasn't too thick, streaky, or hard to handle.  It also handled the pond mani quite well!  


All of the polishes I used for stamping are metallics, so they stamped really well with great image pickup and transfer.  The Essie Mirror Metallic collection is my go-to non-Konad special polish for stamping.


Punkkin was a bit of a surprise because it has a bit of a yellowish tint to the base, which comes out strongly since I used it over and under white.  Like most Lynns it's a thick glitterbomb packed to the gills with all sorts of colors, sizes, and shapes of glitters including some really sweet hearts!  It definitely requires the dab method, but almost all of her gorgeous polishes do, so I'm used to it.  You can get Colors by Llarowe at Llarowe's shop, Elevation at her store, Lynnderella at her store, Essie and China Glaze at Beauty Supply stores and drug stores, and Red Angel plates on Amazon.


Next is my Hanukkah mani!  Let's take a look at Blue-Eyed Girl Lacquer Ma'oz Tzur by Candlelight, which is a black polish with a purple flash and a rainbow of micro-flakies.  I wanted to go with a nontraditional color combination that wasn't the normal silver and blue you usually see for Hanukkah.  Ma'oz Tzur is a liturgical poem traditionally sung during Hanukkah after lighting the festival of lights.  The thought behind this color scheme is to capture the flickering of lights in the darkness.  This is two coats with one coat of Gelous and one coat of KBShimmer's Clearly on Top.


Dry time is typical, and it goes on smoothly without clumping despite being packed full of pigments.  Ma'oz Tzur by Candlelight is a limited edition from my Holiday Limited Edition Collection and is currently up on my store right now.  Don't forget, I'm having sales all weekend, and Ma'oz Tzur will be a part of that sale!


So, what do you have on your nails for Thanksgiving and Hanukkah?  I hope everyone who celebrates has  happy and safe holiday!


Thursday, November 21, 2013

Comparison Thursday: Pale Pink Indie Holos

First thing's first.  I'm selling grab bags again!  I've lowered the price to $25, which includes domestic US shipping, PayPal invoice fee, and 7 polishes.  Contents of the grab bag will be 7 polishes consisting of 2 full size drugstore brands, 1 mini (either indie, drugstore, or salon), 2 full size salon brands, and 2 full size indies.  THESE BAGS INCLUDE HTF AND DC INDIES AND EACH BAG WILL HAVE AT LEAST 1 HOLOGRAPHIC!  The DC polishes are ones that came out last year that have been discontinued for a very long time.  Those will be going first, so grab one while you can!  I will be accommodating with color and finishes, but I can't tell you which polishes are available or let you choose the polishes that will go into your bag as that's too time consuming.  Please email me at wishesofablueeyedgirl@gmail.com for inquiries.  Please include your paypal address as well as your favorite/least favorite colors and finishes.  For more information, check out my blog page: http://wishesofablueeyedgirl.blogspot.com/p/blog-sale-or-swap_17.html.

Ok, now that the shameless plug is out of the way, let's get down to the comparisons!  I've chosen Enchanted Polish September 2013, Enchanted Polish J'Adore, and Blue-Eyed Girl Lacquer We Saved the World, I Say We Party! (aka Buffy) from the Once More with Feeling Collection.  Let's take a look at how they compare below.


As you can see from the bottle shot, the colors are quite different.  Buffy is a more greyed out pink that leans lilac.  September is a rose, and J'Adore is a super pale and dainty pink.


The rainbow effect is minimal in J'Adore to almost non-existent.  It's relatively strong in Buffy, but this lighting doesn't showcase it very well.  September, however, is the most brightly rainbowed.  Yes, rainbowed is now a real word...


As for application, Buffy was very easy to work with and only required two coats.  There isn't any dragging or balding like with so many other holographics.  You also don't need to use an aqua base.  September comes in second in terms of application.  It was also a two coater, but it was a bit thick in comparison.  Lastly, J'Adore is just so sheer that it required four coats, which means that it took forever to dry.  The consistency also wasn't all that great as it was also a bit thick.


So, there you have it!  You can purchase Enchanted Polishes at her store as well as several e-tailers.  Follow Chelsea at her Facebook and IG for news and updates on releases.  My polishes are available at my store here.  Follow me on Facebook and IG for news and updates on new polishes, releases, sales, and giveaways!

So, now that I've featured one of my own polishes for Comparison Thursday, is this something that you'd like to see more often?  What polishes would you like to see compared from my line?  Let me know in the comments, and I'll see if I have them!  I don't try to intentionally dupe other polishes, so any such duplication is purely coincidental.  Often times, I'll have worked on something for several months before release, and then once it's released another polish comes out just like it.  Either way, though, I'm always glad to show you comparisons, and that includes comparisons using my own polishes!

Tuesday, November 19, 2013

Hololoooooove!

I'm writing this post in the comfort of my pj's and all bundled up in covers.  Alas, I'm sick.  Again.  I'm not sure why I haven't gotten used to this by now as it is an every day norm for me these days.  Still saving up for my surgery, so working my butt off with all of my jobs.  It never gets old...  Although, I now wish I would've invested in one of these instead of my legal education, lol!  Click the link.  Go on.  I'll wait.  Ok, now that we all feel a little bad for ourselves, let's take a look at one of the manis that made me super happy to see again while going through my old photos.  Yes, I'm still going naked for Naked November and still going a little stir crazy because of it!  Tonight's post is Color Club Cloud Nine with an accent nail of Lynnderella Ghost of a Chance.  The proper review will be on Cloud Nine, and I'll talk a little bit about Ghost of a Chance in the Overall Thoughts section.  Ready?  Ok, get your polarized glasses on, these pics are a bit blinding.


*I was not financially compensated for this post.  All items in this review were purchased by me for my own use.  The opinions are completely my own based on my experience.  For more information, please see my Disclosure Policy in the tab above.*


Color: Lilac linear holo that leans pink in some lights and purple in others.


Finish: Holographic – pigment gives polish a rainbow in the sunshine.


Bottle / Brush: Color Club – square bottle is not too hard to hold.  The wand length and brush are average.  Easy application.


Opacity: High – opaque at two coats.


Glitter Application: N/A
Consistency: Medium – applies easily and doesn’t flood the cuticles.


Overall Ease of Application: Hard – applies with some dragging and balding.  Spreads well with manipulation.  Requires quick work to get a smooth result.  Unlike most holos, the Color Club Halo Hues don't need an aqua base to go on smoothly.  They do, however, require quick application and a little extra time to dry between coats to ensure a smooth finish without dragging.


Stampability: Not tested for stamping, but I'm hoping to play around with some holographic stamping soon!
Dry Time: Medium – dry to the touch with minimal smudging in 3-8 minutes.


Overall Thoughts: Look at how gorgeous Cloud Nine is.  I mean, wow.  This is in my old lighting setup with less direct sunlight and more artificial lighting, and it's still blindingly holographic, despite the lackluster lighting setup.  This means that it's still very holographic in most lights, which makes this bad boy suuuuuuper awesome.  Application was relatively easy, too, so that's a huge plus in my book.  So many holos are a pain in the butt to apply, so this was a nice change of pace.  Lynnderella Ghost of a Chance is a glitter topper with a cloudy shimmer base with tiny iridescent glitters, white hexes and squares, yellow, lavender, pastel green, and baby blue hexes, and light pink hearts.  The milky base dulled the holo, but I still really liked the effect it had as an accent nail.  The glitters came out of the bottle very easily and spread nice and evenly on the nail without clumping.  I need to wear this for real sometime, but I'm not sure exactly what color I'd wear as undies.  Overall, I really liked the daintiness of this mani.  As my friend Sara from Born for a Storm would say, it's dainty as f^@$.  I think that sums this mani up nicely.


I purchased my Color Club Halo Hues on Amazon.  You can purchase Lynnderellas at their store here.  Follow their fan-run FacebookTwitter, and IG pages.

*I was not financially compensated for this post.  All items in this review were purchased by me for my own use.  The opinions are completely my own based on my experience.  For more information, please see my Disclosure Policy in the tab above.*


Wednesday, November 13, 2013

Shimmer Polish Jasmine

Well, now.  I'm finally getting back to one of the Shimmer polishes I was sent for review a few months ago!  I thought I'd pepper them over the next couple of months so you guys get a good hit when you least suspect it!  Haha!  Tonight, we're going to check out Shimmer Polish's Jasmine!  The color in the bottle kinda sorta reminded me of my favorite Jasmine, Princess Jasmine from Aladdin!

Isn't she purdy?


Ok, ok ok.  I'll stop bothering you with gifs now and get back to the polish...


*I was not financially compensated for this post. I received a sample for review purposes. The opinions are completely my own based on my experience.  For more information, please see my Disclosure Policy in the tab above.* 


Color: Clear base with teal, copper, gold, and pops of blue and red glitter.
Finish: Glitter Top Coat – glitter in a clear base to be worn as a top coat.


Bottle / Brush: Round bottle – the brush and wand are the standard width and length.  Easy to control and manipulate.


Opacity:  Glitter topcoat – not designed for full opacity.  HOWEVER, I'm pretty sure that this bad boy is dense enough to apply three coats for full opacity.  Granted, you'll have to deal with the fallout of having to scrub off three heavy coats of glitter.  So yeah, up to you...
Glitter Application:  Medium – requires the dab method, but glitters are easy to extract and spread evenly.  It only required the dab method because the base was just so densely packed with glitter.


Consistency: Thick – thick or it can be clumpy, but is easily remedied with some polish thinner.
Overall Ease of Application: Medium – applies well with minimal clumping, dragging, or balding.  Spreads well without much manipulation.


Stampability: Not designed for stamping.
Dry Time: Quick – dry to the touch without smudging in under 3 minutes.


Overall Thoughts:  Yeah, this polish was a surprise for me.  In the bottle, I wasn't sure how much I was going to like it as I'm not the type to typically go for golds, but as soon as it was on my nails it was looooove.  I can't wait to try it over a cream or white.  Here, I've worn it over Indigo Bananas Immortal Game, which is where the pink flash comes from.  Application was easy for such a densely packed glitter.  The glitter to base ratio for this is strongly in favor of the glitter over the base.  The dab method worked perfectly with just enough glitter coming off of the brush and onto the nail.  All in all, I really like this polish way more than I thought I would.  I'm starting to see a trend here!  Cindy has made me fall in love with golds and coppers, which I didn't think could ever happen!  So, hustle on over and grab yourself a bottle!

You can purchase Shimmer polishes for $12 from Cindy's Etsy store, or here are instructions for how to email her your order. Follow her on her blog, Facebook, Twitter, and Instagram for news and updates.

*I was not financially compensated for this post. I received a sample for review purposes. The opinions are completely my own based on my experience.  For more information, please see my Disclosure Policy in the tab above.* 

Thursday, November 7, 2013

Comparison Thursday: Dusty Pink Cremes

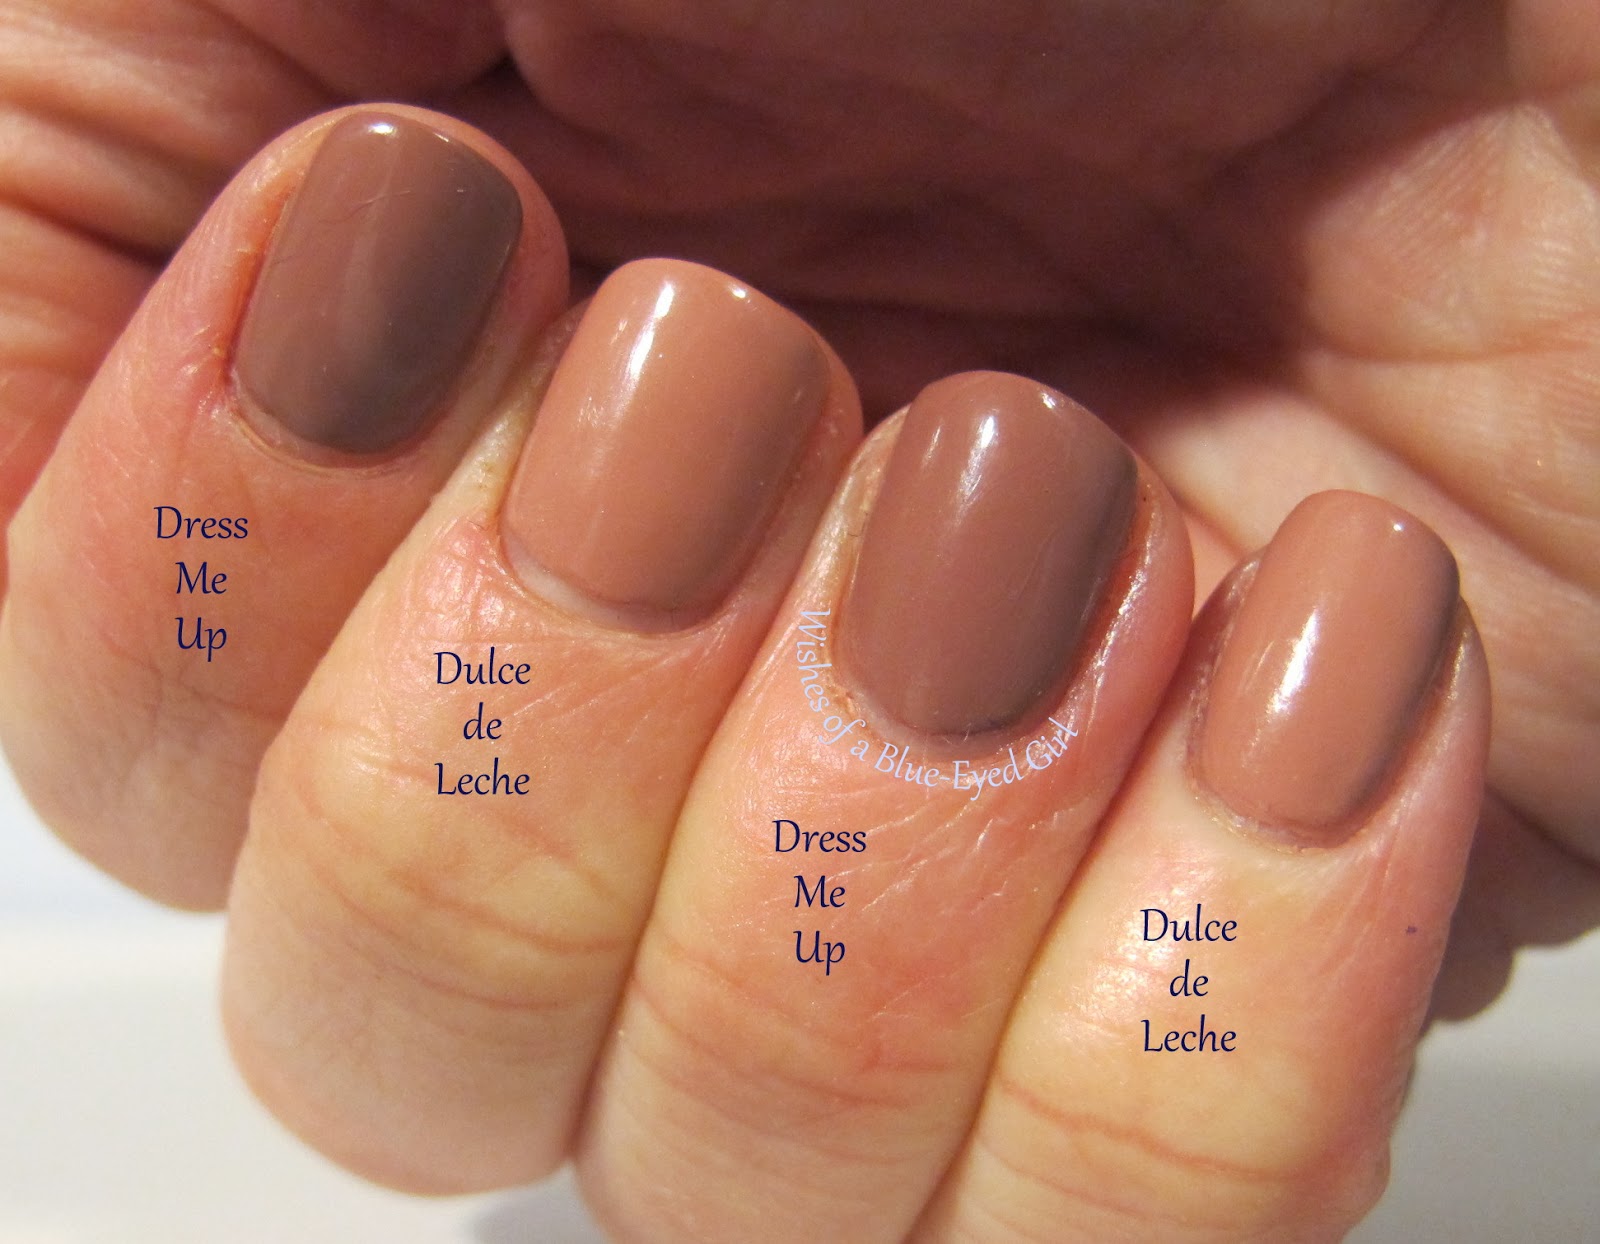
Tonight's Comparison Thursday is going to be a simple one - dusty pink cremes.  When I bought OPI Dulce de Leche I thought, hmmm, this seems familiar...  I got it home and took a look at my stash and immediately spotted a polish that was just so close in the bottle that I just had to compare them.  So, I present to you OPI Dulce De Leche versus China Glaze Dress Me Up.


In the bottle, they both look just so similar.  Dress me up is just a hair darker in the bottle than Dulce de Leche.


The bottles and brushes, however, are extremely different.  I vastly prefer the shape of the OPI bottles over the China Glaze bottles.  They're easier for me to hold onto.  As you can see in the photos below, the OPI Pro-Wide Brush is significantly thicker than the China Glaze standard brush.  Application with the Pro-Wide Brush is a little tricky for those with smaller nail beds, but pretty nice for those with larger and longer nails.  The China Glaze brush is a lot thinner, but this polish was so easy to apply that a thinner brush wasn't a problem.


The polishes are vastly different on the nail.  In the bottle, they look pretty similar, but on the nail Dress Me Up dries quite a bit darker.


Dulce de Leche applied like most OPI cremes.  A bit streaky the first coat with a tendency of pooling at the cuticle but building nicely in two to three coats.  Dress Me Up was amazing to work with.  It is a one coater. I LOVE when polishes go on perfectly in one coat!


Here's another shot of them together.  I ended up keeping Dress Me Up and selling Dulce De Leche because I didn't see the need to keep both, and, honestly, why wouldn't I keep the one coater?!


The highly pigmented nature of Dress Me Up made it work great with stamping!  I love the monochromatic look for stamping, and these two were perfect for that.  I think it would've worked better had I applied my Orly Bonder before stamping (pro tip - sticky base coat over top coated undies helps the image transfer from the stamp!).  You can see my review of these two stamped in my guest post for Color Me So Crazy here.


Unfortunately, Dress Me Up was from the Hunger Games collection that came out last year, so it is discontinued.  However, you can often still find it where China Glaze polishes are sold, at salons, or on blog sales.  As far as I know, OPI Dulce de Leche is still available in the OPI core line.  

So the question remains, which do *you* like better?