Showing posts with label Nail Vinyls. Show all posts

Tuesday, September 2, 2014

Game Day Mani: Clemson

Now that Pretty Little Liars is over, I'm going to start using my normal #RedCoatTuesday slot to honor a different Red Coats - the University of Georgia!  [For those not in the know, UGA's marching band is called the Redcoat Band, which I was in for two years in college!]  So, every Tuesday, I'm going to share my team spirit!  I apologize to anyone who doesn't like UGA, but at least red and black are pretty together!  Tonight's mani includes stamping, decals, and Swarovski crystals!  Let's take a look!

Purchased by me or given as gift.

First, though, here's me, Mr. Blue-Eyed Girl (would that be Hazel-Eyed Boy?), and UGA VI in our Redcoat uniforms.  Band geek and proud!


I used the following items for this mani:


Cult Nails Tempest, Cult Nails Nevermore, Cult Nails Kiss, Konad White, Konad Black, Essie No Place Like Chrome, Cheeky plate CH52 from their Summer Collection, Nail Dot water decals, Nail Vinyls, and little red Swarovski crystals I received as a gift!


I started out by applying my undies, (thumb to pinkie): Nevermore, Tempest, Tempest, Kiss, Nevermore.  Next, I stamped onto my thumb, index, ring, and pinkie fingers using the Cheeky plate.  For my thumb and pinkie, I did a double stamp using Konad White and Cult Kiss, which actually stamped really well.  On my index finger, I stamped using the Essie.  Lastly, I used Konad Black and White on my ring finger over Kiss.  This was my first time doing the double stamp, which came out better than I had anticipated!


Next, I used the little G water decal from Nail Dots that I applied over the silver stamping.  I like these little decals, but they always tend to wrinkle and stick up around the edges, which is not so awesome.  I ended up using an extra coat of topcoat to smooth it down.


Then, after I waited for my coat of Tempest to dry on my middle finger, I applied the Nail Vinyls and painted on Kiss and Nevermore.  This was probably the best Nail Vinyl mani I've ever done!  I think it's because I waited long enough for my base to be 100% completely dry and removed the stickers as soon as I put the paint down without letting it dry.


Lastly, I added on the Swarovski crystals and added another layer of topcoat.  I was actually really surprised that most of these crystals lasted for two days, and I only lost two!  I'm not normally the type of person who likes doing anything that sticks up on my nails, but these aren't that bad or inconvenient.


All in all, I was so pleased with the outcome of this mani!  I highly doubt I'll be doing anything this elaborate for future game-day manis, but I wanted to go all out for the season opener.  Do you follow any fall sports?  Do you like to do fun manis to show your team spirit?

Tuesday, July 29, 2014

Pretty Little Liars: Rainbow Honey Sample and Annual Emotion


Tonight's post is going to be a combo just like last week's where I combine both my #RedCoatTuesday post with a Summer of Untrieds post!  As per my usual, I haven't seen tonight's episode and won't be able to until sometime tomorrow or later tonight, so no spoilers please!  Today's Summer of Untrieds theme was Rainbow Honey, and I chose a red polish, fortuitously apparently, that also doubles as my Pretty Little Liars Mani!  So, let's get to it, then!


The rules are easy!
  • Paint your nails red, do your lips red, do a shadow design in red, or do anything beauty related that is mostly red.
  • Add your blog and photo to the inlinkz!  If you don't have a blog but do have an IG, you can check this link for directions on how to use your IG for inlinkz.  If you don't have a blog or IG, you can just add your photo to the linkup or send it to Color Me So Crazy, and she will get them up for you!
  • Use the #RedCoatTuesday tag when you share your photos on IG, Twitter, or Facebook!
For the Rainbow Honey challenge, I chose an unnamed sample I received from a random blog sale and Annual Emotion, which came out last December.  I got bored easily with the plain silver foil, though, so I went ahead and added some stars using @Teismom's Nail Vinyls.


The unnamed sample polish is a cherry red with red and silver micro-flakies with bits of silver holo particles.  It built up very easily in two coats, and I didn't need to use any extra topcoat to help smooth down errant glitters.  Dry time was pretty average even using a coat of KBShimmer's Clearly on Top.  


The particles came out of the bottle easily and spread across the nail without needing the dab method or other placement.  The consistency wasn't bad, as it wasn't too thick nor too thin.  I didn't need to add in any thinner, which happens often for me with Rainbow Honey polishes.  The consistency stayed nice and fluid the whole time I did my mani without any further thickening or clumping.  Application was easy and didn't require cleanup at all.


Annual Emotion is a silver foil with a touch of linear holo in the base.  The first coat covered pretty well, but it's definitely one of those polishes that you need to carefully apply or it will drag and bald.  Make sure you wait until each coat is dry before you apply the next coat.  I ended up using three coats to ensure there weren't any bald spots in my photos.  Otherwise, the consistency was a bit more fluid than the sample, and required a bit more cleanup.  Dry time was average between coats and was fairly quick with a coat of KBShimmer's Clearly on Top.


The Nail Vinyls were easy to apply, but make sure your polish is completely dry before you use them.  I always make the mistake of trying to use them before my polish is dry and, inevitably, have to redo at least one nail.  Someone in one of my Facebook groups recommended taking the vinyl and pressing it on my palm once or twice before applying it to my nail, and that helped me keep the stickers from pulling up my polish too badly.  I used one coat of the sample over the vinyls and quickly removed the stickers so the fresh paint wouldn't stick to the stencils when I removed them. 


I really like how unique these polishes are in my collection.  The silver holo is the only one I own that's more foil than holo, and I wish that the holo was a bit stronger even in the sunlight.  The flakies in the sample were dense without looking cluttered.  All in all, I truly enjoyed the look of this mani!  


You can purchase Rainbow Honey polishes at their store.  Follow them on Facebook, Instagram, and Twitter for news and updates.


(Source)

Tuesday, May 27, 2014

Happy Memorial Day!

I know it's a day late, but I wanted to post my Memorial Day mani and to take a moment to think about those individuals who died while protecting our freedoms and to say thank you to the families who have lost their loved ones defending our country.  What you've lost cannot be repaid, but know that both their and your sacrifices were not for nothing.  My sincerest and deepest condolences to you all.

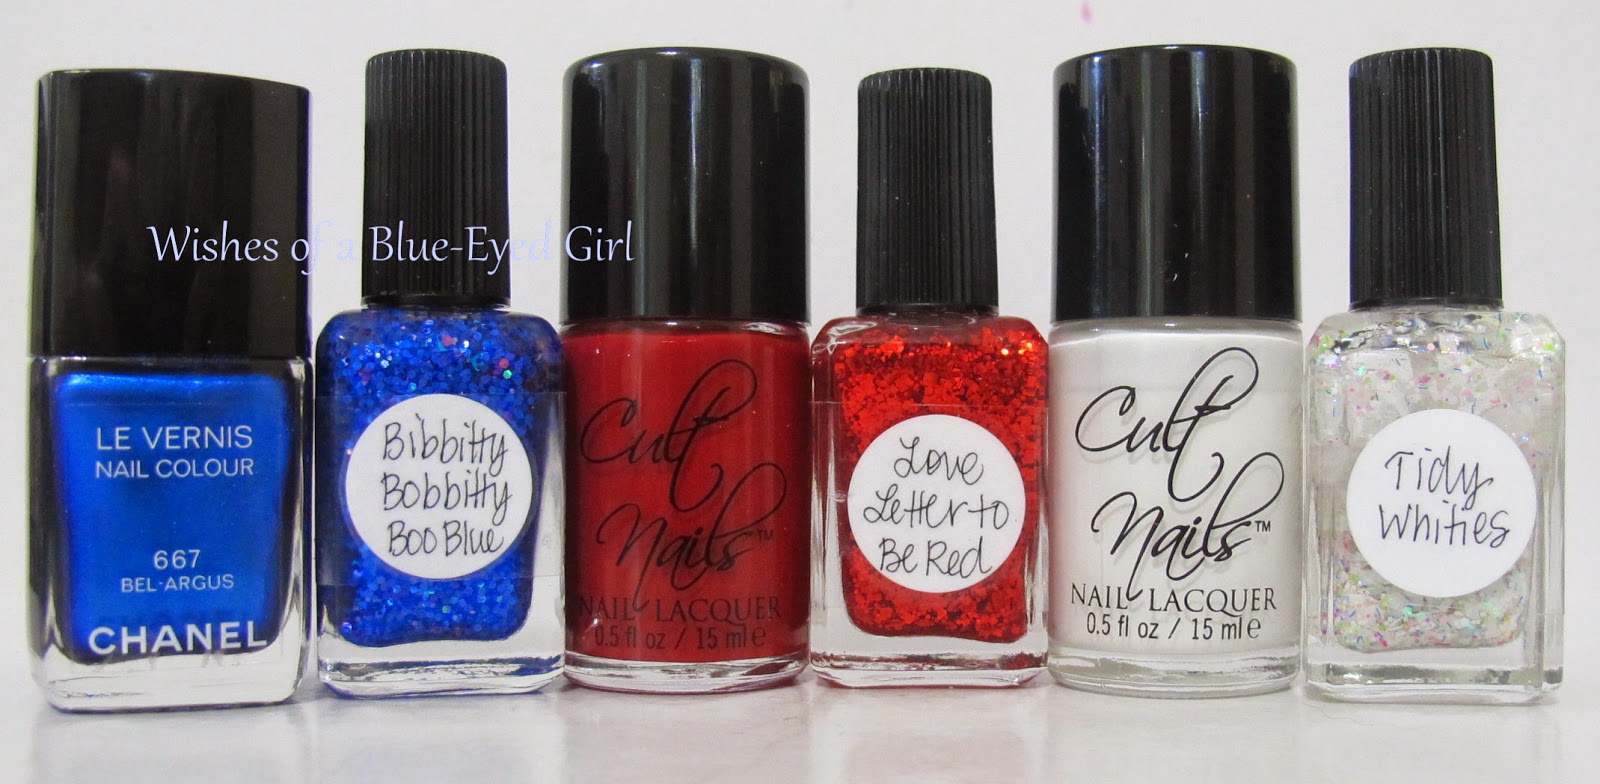
And now I feel that a stupid manicure really isn't important in the grand scheme of things if you really think about it.  That being said, I'll just make this a quick photos only post.  On my right hand, I used Emerald and Ash Mei Scattering (a white jelly with a super duper subtle holo shimmer, which is also my #1 favorite white jelly), topped with Sonnetarium Snowfall, and then stars made using nail vinyls by @Teismom using Lynnderellas Nail Bed of Roses and Mermuse.  On my left hand, I used Chanel Bel-Argus under Lynnderella Bibbitty Bobbitty Boo Blue, Cult Nails Kiss topped with Lynnderella Love Letter to be Red, and Cult Tempest topped with Lynnderella Tidy Whities (I wish now that I had used Mie Scattering again, but c'est la vie, I suppose!).  All polishes in this review were purchased by me or were gifts from friends.


Thursday, February 20, 2014

Golden Oldie Thursday Polish: Chevrons

Tonight's Golden Oldie Thursday is all about Chevrons.  Since I am nail art challenged, I decided to use some guides that I received as a Galentine's Day gift from one of my polish besties, Sara, who got them from Nail Vinyls.  I actually also purchased a few other things myself from Nail Vinyls that I'm pretty excited to try!

As always, here is the schedule of events if you would like to follow along or participate.


Remember the rules:

  • The polish you use must be at least a year old.
  • If you haven't been a polishaholic for that long, you can use the oldest polishes you have.
  • The polish should be previously used, but if you're stuck, you can use a polish from your untrieds stack.
  • You can use more than one polish as long as it fits the rules.
All polishes were purchased by me.

Tonight, I decided that I'd give nail art using soak off gels a shot.  My nails were breaking a bit, and I wanted to use the gels to help get a little better support while they grow out.  It was a pretty time intensive process that I'll describe below.


The polishes I used were all from Gelish that I purchased at Sally's at the end of 2011 and early 2012.  I used Shake it Til You Samba, You're So Sweet You're Giving me a Toothache, and Izzy Wizzy Let's Get Busy.

First, I applied one thick coat of Samba and cured it.  Next, I applied the vinyls to the freshly cured gel.  If you do your own SOGs, then you know that the color layers stay slick and tacky untl you've applied the topcoat.  That being said, it was a giant pain in the butt to get the decals to stick.  


After the decals were in place, I topped the mani off with So Sweet.  Unfortunately, because the decals wouldn't stay put, the watery gel just seeped right underneath.  I flash cured each finger for 10 seconds to keep the gel from sliding around, which helped in the spots where the decals were sufficiently affixed to my nail.  


After one coat of So Sweet, I took off the decals to assess the outcome.  As I suspected, bits of So Sweet seeped underneath and cured a bit funky.  I used a bit of acetone and my cuticle nippers to fix the edges a bit and to cut down any parts that were sticking up.


After that first coat, I decided to just free hand the remaining two coats of So Sweet and cleanup a bit as I went along.  I still flash cured it after each finger to ensure that it wouldn't slide around while I finished up my hand.


After I finished the art, I topped it all off with Izzy Wizzy and topcoat, cleaned it up, and it was ready to go!  


I wasn't that pleased with the outcome after I first finished.  For some reason, it looked weird to me.  Maybe because it reminds me of an Easter egg.  Or maybe it was because my skin was so ridiculously dry after using all of that alcohol and acetone to dehydrate and cleanse my nails.  


Either way, I decided not to do the same thing with my left hand.  Instead, I attempted a simple diagonal tape mani.  However, I had the same issue with it as I did with the chevrons.  The tape wouldn't stay down, and I had a lot of seepage underneath the tape.  I did my cleanup and went to bed.


When I woke up this morning, I was much more pleased with the outcome.  In fact, I'm actually happy with it and hope it lasts for a week or so before bubbling and lifting.  I tried a few things differently this time by using acetone instead of trying to do a dry cleanup between layers.  We'll see how that effects the wear time.

After all of that, though, I want to make perfectly clear that the Nail Vinyls work AMAZINGLY WELL on regular polish or completed SOGs.  It's just the weirdness of gels in between curing and before finishing the full mani that caused my issues.  However, my nail art noobishness really shows here because I should've used alcohol to remove the tacky layer before trying to add the decals.  That was what was recommended to me today by the super SOG expert Chickettes for the future, so I'm going to try that next time for sure.  Anyway, I really like the vinyls and cannot wait to try out more!

So, what do you think of my mani?  Do you do your own SOGs?