Showing posts with label gel polish. Show all posts

Thursday, February 20, 2014

Golden Oldie Thursday Polish: Chevrons

Tonight's Golden Oldie Thursday is all about Chevrons.  Since I am nail art challenged, I decided to use some guides that I received as a Galentine's Day gift from one of my polish besties, Sara, who got them from Nail Vinyls.  I actually also purchased a few other things myself from Nail Vinyls that I'm pretty excited to try!

As always, here is the schedule of events if you would like to follow along or participate.


Remember the rules:

  • The polish you use must be at least a year old.
  • If you haven't been a polishaholic for that long, you can use the oldest polishes you have.
  • The polish should be previously used, but if you're stuck, you can use a polish from your untrieds stack.
  • You can use more than one polish as long as it fits the rules.
All polishes were purchased by me.

Tonight, I decided that I'd give nail art using soak off gels a shot.  My nails were breaking a bit, and I wanted to use the gels to help get a little better support while they grow out.  It was a pretty time intensive process that I'll describe below.


The polishes I used were all from Gelish that I purchased at Sally's at the end of 2011 and early 2012.  I used Shake it Til You Samba, You're So Sweet You're Giving me a Toothache, and Izzy Wizzy Let's Get Busy.

First, I applied one thick coat of Samba and cured it.  Next, I applied the vinyls to the freshly cured gel.  If you do your own SOGs, then you know that the color layers stay slick and tacky untl you've applied the topcoat.  That being said, it was a giant pain in the butt to get the decals to stick.  


After the decals were in place, I topped the mani off with So Sweet.  Unfortunately, because the decals wouldn't stay put, the watery gel just seeped right underneath.  I flash cured each finger for 10 seconds to keep the gel from sliding around, which helped in the spots where the decals were sufficiently affixed to my nail.  


After one coat of So Sweet, I took off the decals to assess the outcome.  As I suspected, bits of So Sweet seeped underneath and cured a bit funky.  I used a bit of acetone and my cuticle nippers to fix the edges a bit and to cut down any parts that were sticking up.


After that first coat, I decided to just free hand the remaining two coats of So Sweet and cleanup a bit as I went along.  I still flash cured it after each finger to ensure that it wouldn't slide around while I finished up my hand.


After I finished the art, I topped it all off with Izzy Wizzy and topcoat, cleaned it up, and it was ready to go!  


I wasn't that pleased with the outcome after I first finished.  For some reason, it looked weird to me.  Maybe because it reminds me of an Easter egg.  Or maybe it was because my skin was so ridiculously dry after using all of that alcohol and acetone to dehydrate and cleanse my nails.  


Either way, I decided not to do the same thing with my left hand.  Instead, I attempted a simple diagonal tape mani.  However, I had the same issue with it as I did with the chevrons.  The tape wouldn't stay down, and I had a lot of seepage underneath the tape.  I did my cleanup and went to bed.


When I woke up this morning, I was much more pleased with the outcome.  In fact, I'm actually happy with it and hope it lasts for a week or so before bubbling and lifting.  I tried a few things differently this time by using acetone instead of trying to do a dry cleanup between layers.  We'll see how that effects the wear time.

After all of that, though, I want to make perfectly clear that the Nail Vinyls work AMAZINGLY WELL on regular polish or completed SOGs.  It's just the weirdness of gels in between curing and before finishing the full mani that caused my issues.  However, my nail art noobishness really shows here because I should've used alcohol to remove the tacky layer before trying to add the decals.  That was what was recommended to me today by the super SOG expert Chickettes for the future, so I'm going to try that next time for sure.  Anyway, I really like the vinyls and cannot wait to try out more!

So, what do you think of my mani?  Do you do your own SOGs? 


Wednesday, December 5, 2012

Puuuuuurple!

I asked you guys what I color I should paint my nails today, and you guys said purple purple purple! While I am painting my nails purple (actually as I type this), I have another purple mani to show you guys tonight. Let's take a look at Hare Medusa Luminosa over my purple SOG mani.

Here's the purple gel I made for myself. I don't have any purple gels, so I mixed some up! It turned out really really well. Unfortunately, I dumped most of it on my cream carpet mid-manicure, so I didn't get the application right... It didn't last long on my nails, which sucks. I will say, though, that whoever first discovered using Windex to clean up polish spills on carpets is a GENIUS! Anyway, here's what I wore as undies for several of my purple manicures a few weeks ago.


Next, I topped it with Hare Medusa Luminosa. ML is a purple jelly based polish packed with tons of blue iridescent hexes and purple shimmer. It applied really well, but dried a little gritty, which was easily corrected with two coats of my top coat. 


It just glows!!! I seriously love this polish. 


Here's a macro shot. 


My camera wasn't really capturing the beauty of this polish, but I was able to get a decent one with my phone in the sunshine. Excuse the grainy quality of the photo. I haven't really figured out how to take decent pictures with my phone yet, lol. 


You can purchase Hare on Nikole's Etsy store or at Llarowe. Follow Hare Polish on Facebook for shop updates and news on new collections.

What's your favorite purple polish?

Friday, November 9, 2012

A Gradient?

First, a quick announcement!  My Facebook page is at 541 likes!  As soon as I hit 600 likes, I'm going to host another giveaway!  I've been holding onto this little prize for a LOOOOOOOONG time.  Like a seriously long time.  Like, I bought this prize before I even wrote my first blog post.  So, this is what you'll win- the PERFECT ingredients for a gorgeous jelly sandwich!

OPI My Pointe Exactly, Dollish Polish Domo Arigato Mr. Robato, and Essie Matte About You!

Now, get the word out so we can get this giveaway started!  You can click here to head to my Facebook page, or click in the Facebook box on the right.

Ok, on to today's business.  As I've mentioned before, I wear soak off gels (SOGs) pretty much all the time now.  I've realized that nothing will help my nails grow and stay healthy, so I instead rely on the strength the SOGs give my nails to keep them long.  Normally, I really like my nubbins since I do so much with my hands, but I really wanted to give longer nails a shot without using anything too fake.  Sadly, my skin, nails, and hair are exceedingly dry due to my pretty severe hypothyroidism.  I've had to deal with other issues that hypothyroidism brings along such as fatigue, excessive weight gain, and mood swings, so weak nails was no surprise.  Luckily, I finally have my thyroid levels pretty well under control, and I've been working my arse off to lose the weight I gained during law school.  So far, I'm down a total of 48 pounds with only 10 left to hit my original goal!  However, I have had the damnedest time getting my skin, hair, and nails to cooperate!  Long story short, you'll be seeing a lot of manis with gel polish underneath for a while.  I also plan to start mixing my own gel colors, too, so definitely keep an eye out for those as well!

That diatribe above is to say that, today, we're going to take a look at the gel base mani I've worn under all of my polishes this week!  I've had it on since last Saturday, which is why you've seen so many reds this week.  I used one coat of Red Carpet Manicure Red Carpet Reddy and two coats of Progel Flaming Poker.  


Red Carpet Reddy is a bright red creme.  I love the brush on the RCM polishes because they are shorter than standard brushes making the polish easier to control.  Progel Flaming Poker is a red based polish with red glitters.  It also applied well and had a nice brush.


I love the shimmer in Flaming Poker!  I think this will be a winner for Christmas for sure!


It reminds me of China Glaze Ruby Red Pumps.


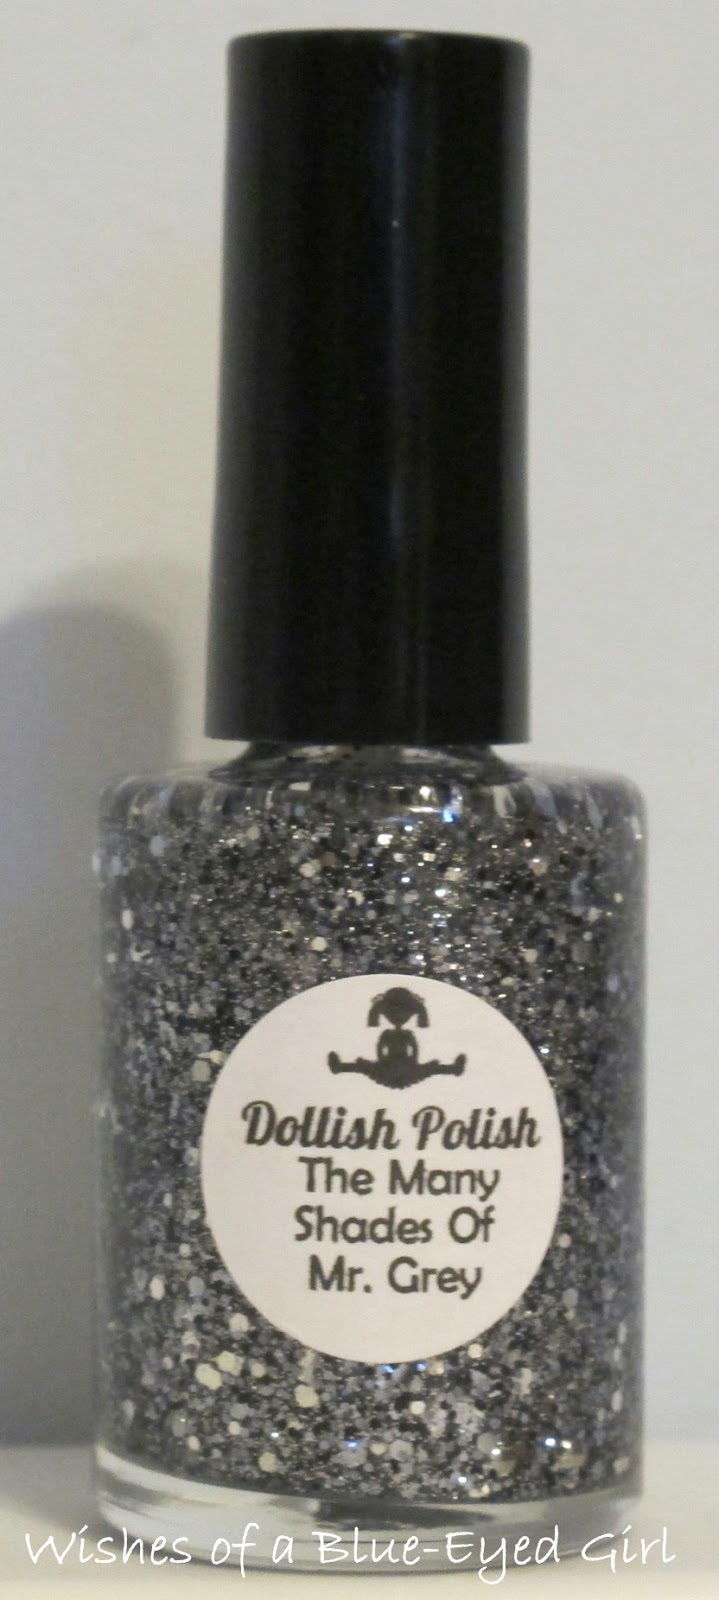
Next, I topped it off with a gradient done with Dollish Polish the Many Shades of Mr. Grey.


MSMG is a clear based polish with black and gunmetal silver hexes.  I can't speak to its application since I only did a gradient.  This polish is 100% bling.  It is absolutely gorgeous!  I know I need to keep working on my gradients, so bear with me as I continue practicing.


Check out the closeup.  This whole mani just screams "look at me!"


If you're into soak off gels, you can purchase RCM and Progel at Ulta.  You can purchase Dollish Polish at her shop, Llarowe, and Overall Beauty.  She had a restock this morning, and there are still several polishes available, including the Many Shades of Mr. Grey, so go snag it now before it's gone!  Check on her Facebook and blog for updates and news on new shades and restocks.

What's your most bling-tastic polish?  The Many Shades of Mr. Grey is a contender, but I have a feeling it will get beaten out by Lynnderella Shape Shifter.

Monday, November 5, 2012

It's ok to peel off your polish!

As I mentioned over the weekend, I gave the ole Elmer's Glue trick a test drive.  However, I wear soak off gels, so I wasn't really sure how this was going to work.  I finished my gel mani, which I'll show you on Wednesday, and went in search of an empty bottle.  I added my glue to the bottle and got my polishes all ready to go.  Now, let's see how to use a glue base coat on top of soak off gels.  [WARNING: This post is very pic heavy!!!!]


First, apply your glue on top of your gel top coat (I use Gelish Top it Off).  Try not to get it too thick or clumpy.


This is what it looks like once you've covered your whole nail.


Next, make sure you let it dry completely.  Here, you can still see a bit of white on the tip.  Don't apply your polish until the white is all gone.


See how my nail is matte now without any white?  This is when you should apply your polish.  


Make sure that all of your nails are ready to go before you apply your polish.  That way you won't have to skip a nail or stop midway through and wait for it to dry.  Here, you can see that my ring finger isn't quite ready.


You guys all know how to apply polish, so I won't bore you with those details.  Just apply as you normally do.  I used Hare's Dog Day Dream, which is a raspberry based polish with red, purple, and fuchsia glitters.  I really wanted this polish when I first saw it, and it did not disappoint.


It applied very evenly with the glitter spreading out without pooling up on my cuticles.  I didn't really need to do much cleanup on my left hand, so I was pretty pleased by that.


Check out a closeup of the glitters.  It looked really great on top of my gel mani (Progel Flaming Poker, which is a red glitter polish).


When you're ready to remove your polish, all you need to do is wet your hands in warm water to get the glue a little malleable   Start to pick around the base near your cuticle careful not to grab the gel.  You can also try to pick around the free edge if you think you can get a bit of the glitter polish/glue base without ruining your gels.  Then, gently peel the polish off.  You can do it with a cuticle stick as shown here or with your fingers, which is how I actually did it myself.


Your polish should pop off all in one sheet or in a few sheets.  Although, sometimes you may screw it up by grabbing the edge of your gel mani instead of the top coats...


While having to redo that particular nail sucked, attempting to scrub glitter off of my SOGs sucks more.  With this method, all you need to do once you remove the glitter regular nail polish is scrub the SOGs with your cleansing solution to make sure you've removed all of the glue.  And, voila!  Your gels are back to pristine condition!


Sorry for the wonk.  My patches aren't very great, but I just can't let this guy break yet.

You can purchase Hare at her Etsy store and Llarowe.  She won't be restocking either shop until mid-November, so check her Facebook page often for the details of her next sale.  Also, be advised that her polishes all sell VERY quickly, so be prepared for cart jacking and super quick sales.  I purchased my Elmer's Glue at Michaels.  Make sure you get the white school glue!  (I'm sure you could get the clear school glue, but I like using the white, which stays white when wet and turns clear when dry.  That way, I won't paint my nails before the glue has completely dried!)

Also, before I go...  Which polish should I wear over my red gel mani tomorrow?  Here are my options:

Dollish The Many Shades of Mr. Grey, Lynn Shape Shifter, Nail-Venturous Crawfish Boil (I may wear this on Wednesday since I have a networking lunch), Dollish Vampire's Coven, or Dollish Spectral Pup?

Do you use the glue base coat trick?

Wednesday, August 29, 2012

Sakura Matsuri

I apologize for the brevity of my posts this week!  We're prepping to head to the beach this weekend, so I'm running around all over the place after work, which eats into my swatching and blogging time.  Today, I'm going to show you an untried polish I wore last week when I had on my ill-fated gels.  Here is Rainbow Honey Sakura Matsuri, which is available on Rainbow Honey's website.  Sakura Matsuri is currently in stock in both the 15ml and 7ml sizes, so if you want it, go and check out their store.  Follow Dee and the rest of the Rainbow Honey crew on their blog and facebook page for updates and news on the brand.


Sakura Matsuri is a clear glitter top coat with fine gold holographic glitters, white hexes, and glitter blossoms in white and pink.


Look at the blossoms!

Like many Rainbow Honey polishes, Sakura Matsuri was pretty thick.  It was also difficult to apply.  I used the dabbing method, but it was still a bit hard to spread the polish evenly across my nail.  Plus, I had to manipulate the blossoms with my brush and cuticle stick to get them into position.


You can see the gels chipping from my intense and unsuccessful effort to remove Lynn Boy Girl Party.

It really is a very pretty polish.  I don't currently own any other polishes with the blossom glitters, and I know there aren't many with them available right now.  The holo glitters shone brightly over the black gels, which was a very pretty effect.


Blurry to see the holo glitters.


Once on, it was bumpy to the touch.  I knew I wasn't going to wear it for very long, so I didn't apply a coat of Gelous to help even it out before my Seche Vite.  That was a huge mistake.  Sometime during the afternoon of the first day, the flowers started popping off.  So, if you have this polish, keep that in mind.  You'll definitely need to add a coat of Gelous (or two) and/or two coats of a thick top coat.  Luckily, since I had already had the gels on for a few days, the glitter layer didn't take very long to dry after I applied Seche Vite.


You can sort of see the bumpiness in this pic.


Verdict: I really like the look of this polish.  It is very feminine and unique, so I'll keep it.  HOWEVER, I will definitely thin it out before I use it again.

Check back tomorrow for Comparison Thursday!  I have some great polishes to show you!

How do you tame top-coat hungry glitter polishes?

Tuesday, August 21, 2012

Konad,well Fauxnad, and Essie Mirror Metallics

The overwhelming theme from the feedback I've received from you guys was nail art, tutorials, and jelly sandwiches. You have spoken, and I shall deliver! Today, I have a combination of nail art and tutorial to show you, but first, let's take a look at my base manicure. Get ready, because this is going to be picture (and word) heavy!!

All last year I would go to the salon and get gel polish manicures, as would my mom and sisters. It just wasn't cost effective even though it made more sense to get gels than regular polish that would chip in a day. When Christmas came around I decided to put the Gelish system on my list, and my awesome sister got my Gelish stash started. I actually credit getting my gel kit with renewing my interest in nail polish again. Now, I have 20 gel polish colors from Gelish, Red Carpet Manicure, and ProGel. Gelish can be purchased at Sally's, but they only have the minis for $14. I try to find mine on sale or on Amazon. You can find Red Carpet Manicure and ProGel at ULTA.


For my base color, I chose untried ProGel Deep Abyss, which is a rich black cream. I have several polishes that I wanted to try layered over black, so I made things easier on myself by using gel. This way, I won't have to reapply the black base color for every manicure. [Tip: you can paint regular nail polish over gels. Just remember to use non-acetone remover when taking off the regular nail polish.] Deep Abyss applied very well. It wasn't runny, didn't pool at my cuticles, and wasn't too thin or too thick. The only problem I had was it slid a bit from the tips of my nails before curing, despite wrapping my nail. I may try a flash 5-10 second cure of each nail right after I paint them next time to see if it fixes the issue.


Black is the new black.

I was very pleased with the application on my nubbins. Since I didn't have to worry about pooling, it was easier to wrap my nails without getting it all over.

The first thing I decided to do to my freshly gelled fingers was Konad!! Well, fauxnad since this time I used the Salon Effects plates instead of my Konad plates. Konading is basically the process of stamping images made from nail polish onto your nails. Don't worry, I'll demonstrate below. I had just gotten a few of the new Essie Mirror Metallics (so I'm still keeping up with the untrieds!!!), and I really wanted to give them a konad test-drive. They were the perfect consistency for stamping. I used Penny Talk, Blue Rhapsody, and Nothing Else Metals.  I've had Metallica stuck in my head for days now because of you, Essie!

Shiny!

All three polishes apply perfectly in one coat, which is how I knew they'd work for stamping. Penny Talk is a rose gold, which is totally unique in my collection. I'm more of a silver-tone gal, so I don't usually buy many golds. The hint of pink is what's keeping this little guy in my stash. Blue Rhapsody is, you guessed it, blue. Nothing Else Metals is a frosty lavender. When stamped, though, it looked a little too silvery, which is a bit of a bummer. I'm looking forward to trying it out on other colors than black to see if it still looks silver. I stamped these bad boys on using Salon Effects plates SE18 and SE19. They turned out so much better than I thought they would! I got so many compliments on this mani it was crazy!

It almost looks like a Hawaiian shirt.

Let's learn how to stamp!  First, you'll need to gather some supplies:


1) Acetone to wipe down your stamp, plate, and scraper.
2) Konad special polish or regular polish that applies thick (full coverage in one coat)
3) Paper towels to wipe down you stamper, plate, and scraper
4) Stamper (mine is from the Salon Express kit)
5) Scraper (I actually use an old credit card, but you can use a membership perks card too.  The metal scraper that came with my set isn't very good, and I don't want it to scratch up my plates.)
6) Stamping plates (I'm using two plates from the Salon Express kit that I picked up from Sally's. The kit can also be found at any store that sells as seen on tv junk.  There are several brands of stamping plate, and you can find most of them on Amazon, such as Konad, Bundle Monster, Mash, Cheeky, etc.)
7) Paper plate to keep polish off of finished surfaces

Ok, now on to the deets.

After you have completed your base color mani, go ahead and apply your favorite fast-dry top coat.  This will ensure that you don't make a mess of all your hard work.  Also, this will protect the base mani from polish remover in case you need to redo your stamp.

First, put your stamping plate on your paper plate.  Get your scraper, stamper, and acetone ready.  You need to do these steps quickly before the polish dries on the plate or stamp, so it's good to have everything readily available.  Next, drop a bit of polish onto the image you'd like to use.  Here, I'm using a dragonfly.  You don't need a huge blob, like mine, just enough to cover the entire image.


After you've dropped your polish on, grab your scraper and run it at a 45* angle to the plate over the image.  If you do it at 90* you'll scrape off all the paint, so make sure it's angled.  I tend to swipe my scraper over the image two or three times because the polish pooled on the end of the scraper fills in the image giving you a more robust picture.  Place your scraper on a piece of paper towel or on your plate.  


Next, take your stamper and gently roll it across the image.  Do not press straight down onto the plate, or you won't be able to pick up the image on your stamp.  Rolling is key!  


Check to make sure your image is on the end of your stamper.  


If it isn't then either you took too long after scraping and before rolling, OR your stamper may need roughening up.  On a clean stamper, try taking a nail file (any will do except the crystal ones) and rub it gently across the face of the stamper.  Then, take a bit of acetone on a paper towel and clean off any debris.  That should help you get the image onto your stamp.  You'll definitely want to roughen your stamper when you first get it.


After you get your image onto the stamper, quickly line the image up to where you want it on the nail and roll it across.  Again, do not stamp straight down or you will get the image on your nail in pieces or not at all.  


If you mess up the placement, take your acetoned paper towel and quickly swipe across the image to remove it.  Only press as much as necessary to remove the image.  Sometimes, you can even scratch the image off with a fingernail.  Don't worry if it dulls the shine of your top coat.  You will be applying another coat after you finish your stamping, and you won't notice any dullness.

After each stamp, go ahead and wipe off your scraper, plate, and stamper.  This way none of your tools will build up polish residue that can rub off on your next nail.  This is also especially important if you're going to layer stamps with different colored polishes like I have above.  You don't really need to worry about letting the image dry, per se, because the thinness of the polish you use makes it dry to the touch.  Also, if you notice some bits sticking up, just use your finger and push them firmly onto your nail.  

When you're done, apply a thick top coat that won't smear your image.  I use Seche Vite because it tends to float onto my nail without the brush really dragging any paint.  You may need to do some cuticle cleanup, as well, since the stamps can sometimes overlap onto your fingers.


Now you can sit back and admire your gorgeous nails.  Be prepared for a barrage of questions because people get so intrigued by nail art, especially precise, clean-looking art like stamping.  I hope this helps some of you feel less intimidated by stamping.  It used to be really hard, but with practice, you'll be able to finish stamping your entire mani in 15 minutes!

Do you use gels or stamps?  What's your favorite type of nail art?