Showing posts with label pastel. Show all posts

Thursday, January 22, 2015

Comparison Thursday: Light Green Cremes


Time for another comparison!  Now, I've already done a light green creme comparison, which you can see here.  However, it wasn't very good and didn't include pretty much any of these polishes.  So, we get Light Green Cremes Part 2!


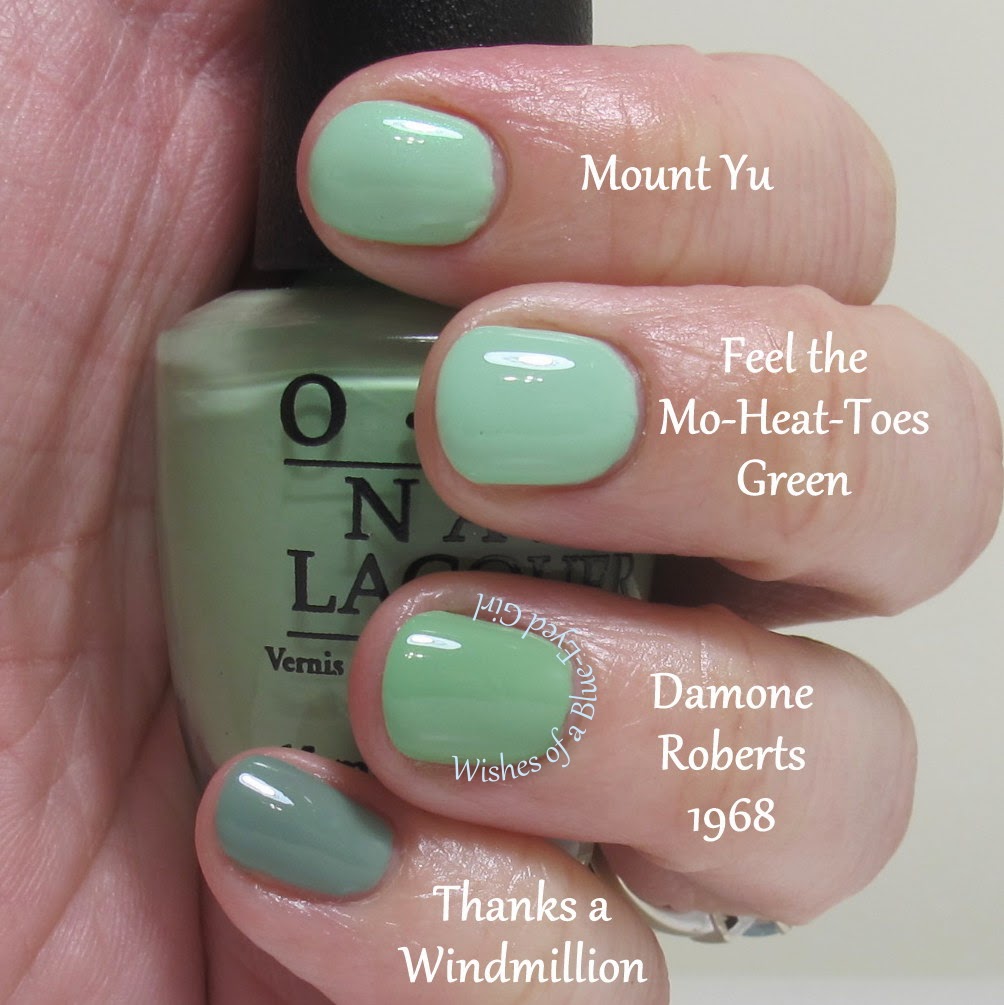
Elevation Polish Mount Yu, OPI Feel the Mo-Heat-Toes Green, OPI Damone Roberts 1968, and OPI Thanks a Windmillion.

Mount Yu

Mount Yu is the only shimmer in the bunch.  It's definitely sheer, but not the most sheer of the batch.  Application was easy, but it had a streaky first coat.  I absolutely love this brush because it's the thinnest of the group, which makes application much easier.  It achieved opacity in three coats.  Dry time was a bit on the longer side, but I used a quick dry topcoat for my photos.  Sadly Mount Yu has been discontinued, but you can purchase other Elevations here.


Feel the Mo-Heat-Toes Green


Mo-Heat-Toes was the sheerest of the bunch.  It's closest in color to Mount Yu minus the shimmer, but they're not duplicates.  It's almost a jelly or crelly.  The first coat is streaky, but the formula was great and didn't flood my cuticles despite the giant brush.  It was pretty much opaque in three coats, but I did four just in case my camera picked up bald patches that I couldn't see myself.  Dry time without a topcoat is average, but I used a quick dry topcoat for my photos.  Mo-Heat-Toes was a Cosmoprof exclusive polish, but I do believe you can find the minis at TJ Maxx.


Damone Roberts 1968


The base color of DR falls right in the middle of Mo-Heat-Toes and Windmillion, but it leans way more yellow than any of the polishes in this grouping.  It is much more pigmented than the first two, but also a little thinner than them formula-wise.  Sadly, the thinner formula made application with OPI's giant brush a giant pain in the butt.  Luckily, I only needed two coats for full coverage, but I used three coats for my photos.  Dry time without a topcoat is average, but I used a quick dry topcoat for my photos.  I purchased this straight from the DR website here.  It's a bit pricier than most OPIs, but it was one that was discontinued for quite a while.


Thanks a Windmillion

TaW is the darkest of the group and leans a little more dusty-sage than the vibrant green of the other three.  It has hands down the best formula of the group, with easy application and almost opaque in one coat.  I'm sure if I did a thicker coat, I could easily do one coat.  I did two coats for full opacity in my photos.  Dry time without a topcoat is average, but I used a quick dry topcoat for my photos.  TaW was part of the Holland release a few years ago, so it's no longer being produced.  However, you can still find it easily in most drug stores or salon supply shops.

So, do you have any of these?  Which is your favorite?

Wednesday, April 9, 2014

Golden Oldies Thursday: Pastels

A week late, but here I am!  I'm not overly fond of this combination, but I didn't have time to redo it, so it'll have to do.  I should've gone with either a lighter blue or maybe even a pale pink or green.  Oh well!  I'll have to try a new base color next time I wear this topper!  Let's take a look!

Here is the GOT Polish schedule of events if you would like to follow along or participate.


Remember the rules:

  • The polish you use must be at least a year old.
  • If you haven't been a polishaholic for that long, you can use the oldest polishes you have.
  • The polish should be previously used, but if you're stuck, you can use a polish from your untrieds stack.
  • You can use more than one polish as long as it fits the rules.
I purchased or received as gifts all polishes in this post.

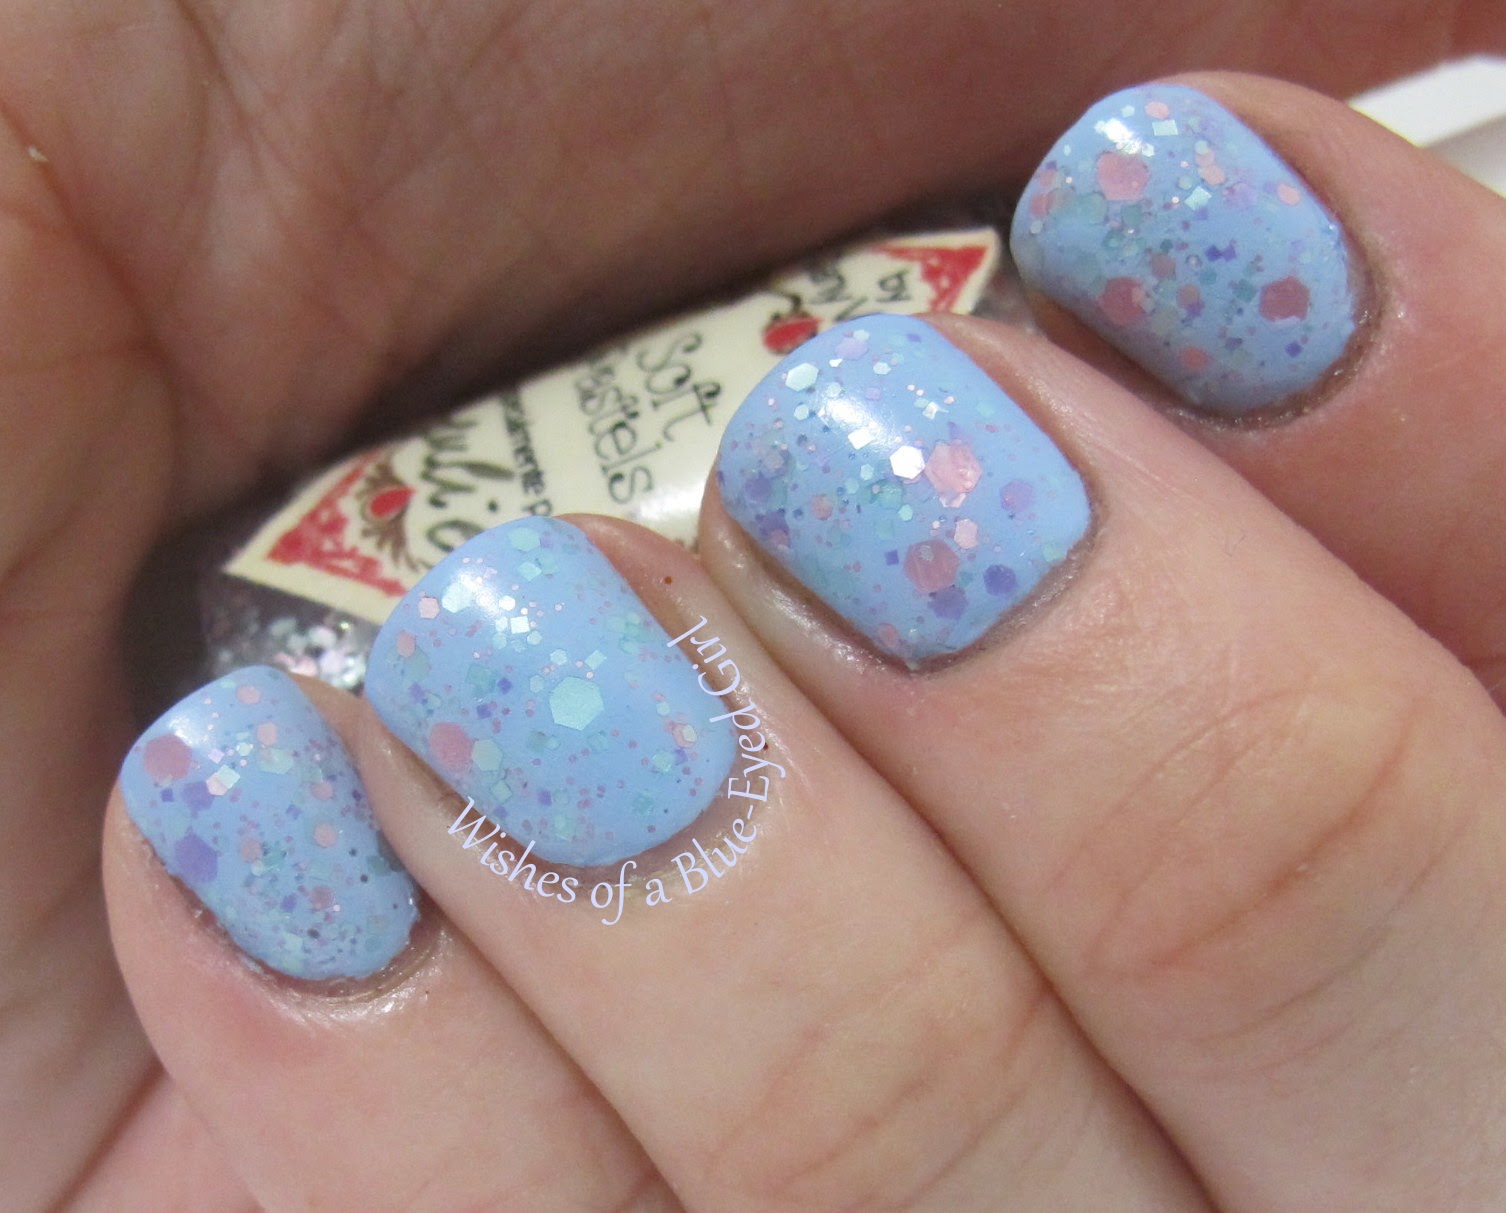
For this challenge, I used Deborah Lippmann's Let's Hear it For the Boys and By Dany Vianna's Soft Pastels - yes it has my name on it!  I topped the look using Cult Nails Wax This...


Let's Hear it for the Boys is a pastel baby blue creme.  This is three difficult coats.  Unfortunately, LHIFTB doesn't self level, which caused some issues when it came to application.  There were some bunching issues as well as balding and clumping.  I used thicker coats to try and make it even, which made it almost impossible to dry despite the fact that I used a coat of KBShimmer's Clearly on Top before I applied the wax coat.


LHIFTB was also a mess to apply.  I got it all over myself, and the milkiness of it made it very difficult to remove from the skin.  If I had Zoya Blu for over a year, I would've much rather have used it instead.  While Blu is paler than LHIFTB, it's definitely got a much better application.  Dry time for LHIFTB took forever to dry, too, so it's definitely not in my list of top favorites.


Soft Pastels is a lovely and delicate glitter topcoat made up of mint green, lavender, and baby pink matte glitters in varying sizes.  The glitter to base ratio is light on the glitter and heavy on the base, so if you want a more dense look than what I have here, you'll need more than one coat.  Due to the glitter payoff being a bit light, you may have to fish some for the glitters.


Otherwise, application and dry time were pretty average.  The top handle and wand are a bit different, and the brush is a little more pliant than I'm used to, but I've noticed that about other Brazilian polishes as well.  It's not a bad thing by any means, but it's just a bit different.  Lastly, it's important to note that Dany's polishes are not billed as 3-free, so make sure you know this before you purchase!


You can get Deborah Lippmann's at beauty supply stores.  You can purchase By Dany Vianna polishes at Mei Mei's Signatures!

Monday, September 16, 2013

Elevation Echinops

When Lulu started making holos, I was pretty excited.  I'm not going to lie - I love me some Elevations, which is obvious if you look at my stash.  I probably have more Elevations than any other indie except Lynnderellas.  I love the variety of finishes and colors she offers, so I was definitely intrigued when I saw her foray into holos, Muztagh Ata.  Sadly, it's still in my untrieds.  However, I do have my second Elevation holo on the blog tonight.  Let's take a look at the delicate and subtle beauty that is Echinops.

*I was not financially compensated for this post.  All items in this review were purchased by me for my own use.  The opinions are completely my own based on my experience.  For more information, please see my Disclosure Policy in the tab above.*


Color: Soft lavender base with scattered holo.
Finish: Holographic – pigment gives polish a rainbow in the sunshine.  Keep in mind, this is a different kind of pigment than what you normally see in holos.  It's a looser rainbow due to the pigment's large particle size that isn't as in your face as other holos.


Bottle / Brush: Rectangle bottle – ribbed cap that is a little hard on the hands to open if you have sensitive skin.  The wand is the standard length, but the brush is a little too thin to pick up large / shaped glitter without fishing.  The brush's width is also an issue for spreading.  It doesn't fan out and pretty much requires you to dab polishes that are densely packed with glitter.


Opacity: Medium – achieves opacity at three to four coats.
Glitter Application: N/A

Under the light of my ice maker...  Always the best lighting to show shifts and holos.
Consistency: Medium – applies easily and doesn’t flood the cuticles.


Overall Ease of Application: Medium – applies well with minimal pooling, dragging, streaking, or balding.  Spreads well without much manipulation.
Stampability: Not tested for stamping.


Dry Time: Medium – dry to the touch with minimal smudging in 3-8 minutes.


Overall Thoughts: If you're looking for an in-your-face holo like the Color Club Halo Hues, you'll be quite disappointed.  HOWEVER, this large particle loose rainbow is still really pretty.  It doesn't come out to play easily, though, and definitely tried to play hide-and-seek with my camera, the little skamp.  I love that the color is definitely a different kind of purple than a lot of the other purple holos in my collection.  Lord knows I have a million purple holos!  This one leans periwinkle at times, which is really pretty, but it's not a straight up periwinkle.  I also feel like it's a more pigmented giving it a heartier look than the sometimes watery holo you typically see.  I'm a little disappointed with the prism, though, as I was definitely hoping it would be stronger.  It will be the perfect undies for a lot of my glitter toppers, which you'll see one combo tomorrow.  Echinops may not have much rainbow power, but I'm pretty sure that the new holos she just released have a much stronger effect.  I'm looking forward to grabbing one to test out.

You can purchase Elevation Polishes at Lulu's store.  Follow her blog for info on restocks and new additions to her line.

*I was not financially compensated for this post.  All items in this review were purchased by me for my own use.  The opinions are completely my own based on my experience.  For more information, please see my Disclosure Policy in the tab above.*

Monday, July 29, 2013

1 Year Blogging - a day of Julies.


Well, it's been 1 year of blogging as of today. I can't believe how rewarding and fulfilling it has been to share my passion with you guys. I truly appreciate each and every interaction I have with you guys, so thank you so very much for joining me in this journey.

First, I wanted to remind you guys of all of the giveaway goings-ons around here! First, don't forget to enter the GIANT 1 Year Blogiversary Giveaway. The prizes are listed here and entry is via the Rafflecopter widget at the bottom of the post. Second, don't forget about the IG portion of my 1 Year Blogiversary Giveaway. Check that out here. Remember, you must share the photo (easiest to take a screenshot and post it yourself) and use all of the tags or I won't see it. If you've entered and haven't received a response from me that looks says "#woabeggiveawayentry xx," then I haven't seen your post and you'll need to make sure all of the hashtags are present. Both of theses giveaways end at 11:59 pm est Monday, August 5, 2013. The third and final giveaway, for today at least, is the Reader of the Month giveaway. Today's challenge is a guessing game! Check out my post on Facebook here for information. It closes tomorrow, 7/30, at noon est.

Alrighty, let's get down to business! Tonight I want to share with you another one of my favorite manis to date. It oozes pastel femininity, which is a nice palate cleanser from the bold and vampy colors I've been sporting lately. Also a bonus, two of these polishes just happen to share my name! Let's take a look at Zoya Julie and Essie Mint Candy Apple topped with Shimmer Julie. The photos without the HK Girl bottle are matte and the photos with it plus the macro of Julie over, well, Julie are shiny.


*I was not financially compensated for this post. I received a sample of Shimmer Julie for review purposes.  All other polishes in this review were purchased by me for my own use.  The opinions are completely my own based on my experience.  For more information, please see my Disclosure Policy in the tab above.*

Shimmer Julie


Color: Multi-color glitter bomb that favors gold, purple, and blue mini and small hexes with accents of green, red, silver, and caramel hexes.
Finish: Glitter Top Coat – glitter in a clear base to be worn as a top coat.
Bottle / Brush: Round bottle – the brush and wand are the standard width and length.  Easy to control and manipulate.
Opacity: Glitter topcoat – not designed for full opacity.


Glitter Application: Medium – requires the dab method, but spreads evenly.
Consistency: Medium – applies easily and doesn’t flood the cuticles.
Overall Ease of Application: Easy – applies well without pooling, dragging, streaking, or balding.  Spreads evenly and smoothly.
Stampability: Not designed for stamping.
Dry Time: Quick – dry to the touch without smudging in under 3 minutes.


Overall Thoughts: When I first received this polish for review, I was worried that I wouldn't be able to find any undies that would do it justice. I didn't want to overwhelm the mani by having a bright and in your face undie when the topper already had a ton of vibrant colors. I think it worked really well over the pastel undies. Application was so easy. It's so densely packed that the glitters came out easily but required the dab method to spread across the nail evenly. I loved this mani so much that I wore it for several days. That's saying something since I usually change my mani every day! As you can see, I actually wore it matte the first day, which was absolutely gorgeous. I used NYC Matte Me Crazy, which is as good as Essie Matte About you but for 1/4 of the price. You can purchase Shimmer polishes for $12 from Cindy's Etsy store, or here are instructions for how to email her your order. Follow her on her blog, Facebook, Twitter, and Instagram for news and updates.


Zoya Julie


Color: Lilac with silver shimmer.
Finish: Shimmer – a polish that shimmers in the light.
Bottle / Brush: Tapered bottle and cap - bottle tapers from a fat top to a smaller bottom making it a little harder to hold if you hold your bottles while you paint.  The tapered cap actually makes for easier application as it's shorter than most caps, but provides enough length to help guide application without being too wide where you grip it.  The wand and brush are a little short, but they have average application.


Opacity: Medium – achieves opacity at three to four coats.
Glitter Application: N/A
Consistency: Thick – thick or it can be clumpy. The polish requires more than 2 coats, but it hits its max thickness at 2 coats. Meaning, it looks a little lumpy at more than 2 coats, but you have to use more than 2 coats to keep it from showing bald spots. Catch 22, much?
Overall Ease of Application: Difficult – pools at the cuticles.  Drags and clumps, streaks, or is bald in spots.  Does not spread well without massive manipulation.  It is quite thick after applying sufficient coats for full oppacity.
Stampability: Not tested for stamping.
Dry Time: Long – dry to the touch with minimal smudging in over 8 minutes due to the thickness required for opacity.


Overall Thoughts: It's such a pretty color, but I was so disappointed by the application. Of course I'm going to keep it because 1) it's my name, duh, and 2) I really want to try it again after some thinner. As I've mentioned above, the polish became super thick on the nail after applying enough layers to reach full opacity. Plus, it got thicker on the brush as I completed my mani. All in all, it's so pretty that I'm going to attempt to use it again before giving up. I purchased Julie during one of their online promotions here. However, you can purchase Zoya at Ulta, Salons, and other beauty supply stores where they are sold.


Essie Mint Candy Apple


Color: Mint green.
Finish: Crelly – looks squishy like a jelly but opaque like a crème.
Bottle / Brush: Essie square - bottle is square, which is easier for me to hold in my hand or between my legs as I polish.  The cap is shorter than most salon brands, other than Zoya, but it is easy enough to hold.  The wand and brush are average with the brush being more on the narrow side.  Application is a little more difficult than normal due to the slender brush.
Opacity: Medium – achieves opacity at three to four coats.
Glitter Application: N/A


Consistency: Medium – applies easily and doesn’t flood the cuticles.
Overall Ease of Application: Hard – applies with some streaking and balding.  Requires sufficient time between coats to ensure no balding. However, it requires quick work per nail to get a smooth result.
Stampability: Not tested for stamping.
Dry Time: Quick – dry to the touch without smudging in under 3 minutes.


Overall Thoughts: I really enjoyed working with this polish, which was a random act of kindness gift from my friend, Samantha. Application was a little difficult as you had to work fast to get enough polish on the nail before it dried and caused a dragging situation. Furthermore, it required three coats to avoid streakiness. Once it was all said and done, though, it dried quickly, which is a huge plus. This is also a perfect mint green for my skin tone - and for Shimmer Julie! You can purchase Essie's at most drug stores, Target, salons, and beauty supply stores.

So, there you have it! Thank you again for coming on this journey with me. I am truly thankful for each and every one of you!

*I was not financially compensated for this post. I received a sample of Shimmer Julie for review purposes.  All other polishes in this review were purchased by me for my own use.  The opinions are completely my own based on my experience.  For more information, please see my Disclosure Policy in the tab above.*